Text Macros
Text macros can be inserted along with other static text. For example, assuming the scale is set to 100000, the text: "Map Scale: 1:%SCALE%" will become "Map Scale: 1:100000" on the page layout.
Use the Select Macros button to insert variable text. The Macros will appear in text editing window inside '%'s indicating it is a variable. Variable text that can be inserted includes:
- Projection
- Name
- Datum Name
- Horizontal Unit
- Long Description
- Short Description
- Date and Time
- Date in Format MM/DD/YYYY
- Date in Format DD/MM/YYYY
- Time in 12- hour format HH:MM an/pm
- Time in 24-hour format HH:MM
- Map Scale
- Layout Page Number/ Tile Name
- Map Title - This is auto-generated in MapBook creation.
Macro Editor
Manage custom macros using the macro editor. Custom macros can contain company information, copyright, and other text such as parts of a Title Block or metadata that might be recurring values. Integrated custom macros with a Map Layout Template, to create consistent text elements such as title blocks and metadata. Customs macros can be stored specific to the workspace, or set as accessible for any map created on the computer. Custom macros that are not workspace specific are stored in a custom_macros.txt file in the User Data folder.
This is available in File menu under Preferences... in the Map Layout Editor. It can also be accessed directly from a Text Element by pressing the Edit Macros... button.
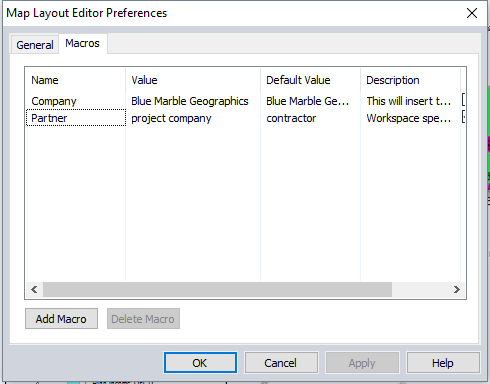
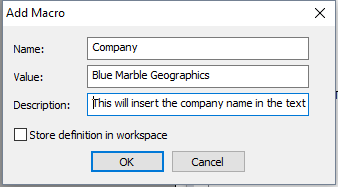
Add Macro -Click this button to add a new macro to the list. The Add Macro dialog will be displayed to collect the information that defines the macro.
Name - The variable name of the macro that will be displayed in the text element in %%. It can not be blank, can not contain spaces, and must be unique.
Value- This is the string that will replace the macro in the text element. It can not be blank. If the "In Workspace" box is checked, then this value will be stored in the workspace.
Default Value - This is the value that will replace the macro in the text element if the macro is not stored in the workspace. This is the value that will be stored in custom_macros.txt.
Description - This is the text that will identify the macro in the macro selection list. This list is on the properties window for a text element so the user can easily add a macro to the element.
In Workspace- This check box indicates whether or not the Value of the macro will be stored in the workspace.
To edit a macro, click on a field in the table view so it is highlighted. Click again to edit the value.
Delete Macro- Delete the selected macro(s). This button will be disabled unless a macro is selected in the grid.
When the OK button is clicked, the custom_macros.txt file will be updated.