 Creating a MapBook
A MapBook is a multiple page layout based on a template or the current map layout. This tool creates multiple pages with matching layouts, but with different data displayed within the Map View Element on each page. This is ideal for generating Atlas type products, or creating other series of maps that have a consistent design.
In the Map Layout Editor, go to the File Menu to create a MapBook.
Steps for creating a MapBook:
- Load data representing the full extent of the area you would like to generate maps for.
- Create a Map Layout. Include any Map Elements that will be the same on every page of the MapBook. For text elements, use macros to define text that is variable by page.
- Create a MapBook from the Map Layout Editor file menu. Choose the layout to use as the template, and what elements to duplicate on every page. The Tiling tab defines how the map data is divided into different pages. The Export Bounds define the extent of the data to be covered by the pages of the MapBook.
- Once the MapBook has been created, you can interact with each page individually to make any modifications. You can also go back to the main application and load additional data that will be displayed in the Map View Elements.

General MapBook Options
Page Template - The MapBook page layouts can be generated using the existing visible Map Layout, or by loading a saved template. If no saved template is created, the layout of the selected map page will be used for the created mapbook pages.
Use the Same Map Legend on All Pages - Check this legend options to show the legend for the full vector data set on each page
Include Tile Bounds Index on first page - This option creates an index page at the beginning of the MapBook that shows the full extent with footprints of each MapBook page.
Tiling
Tiling is used to define the breakup of the MapBook Export Bounds. All of the tiling options divide the data extent while preserving the aspect ratio of the Map View element in the Page Template. Choose to define tiling based on the bounds (height or width) or specify a map scale to use in each tile. The MapBook will calculate the necessary number of pages and the bounds displayed on each page using the Tile Definition settings. There are also options for overlapping the data in each tile, and naming the resulting pages.
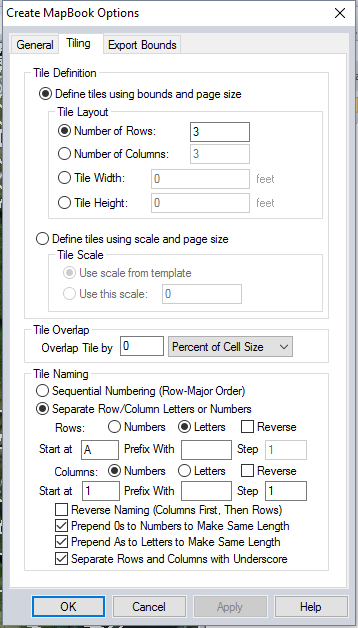
Tile Definition
Rows or Columns: Specify the number of tiles horizontally OR vertically. The other dimension will be calculated based on the aspect ratio of the Map View element in the template.
Tile width or height: Specify the width or height in the current projection units for the map view on each page. The other dimension will be calculated based on the aspect ratio of the Map View element in the template.
Define tiles using scale and page size: This setting calculated and adjusts the number of tiles to fit the export area at the defined scale. Choose to either Use scale from template or specify an explicit Scale value.
Tile Overlap
Specify an amount of overlap between the map on each page. This can be defined as a Percent of Cell Size.
Tile Naming
Naming of tiles. All options from a normal export dialog for tiling apply to this dialog. See more information here.
Layers
This tab contains option to include all layers from workspace, or select specific layers from list. If the option to include all layers is selected the layer list and associated buttons will be disabled
Export Bounds
The export bounds setting determines the overall extent of the data that will be tiled. Because of the dimensions of the Map View Element (aspect ratio), the extent of the resulting pages will vary slightly with this to maintain the same Map View Element size on each page.
These options are common to other export dialogs. See more information here.
 Creating a Feature MapBook
A Feature MapBook is a multiple page map layout where the location and extent of the pages is derived from selected vector features of interest. This function will create a series of map pages based on a template, one for each feature that is currently selected on the main map view. This tool will be disabled if no feature is currently selected with the digitizer tool.
The Create MapBook Options dialog will be displayed with two tabs:
Steps for creating a Feature MapBook:
- Load data representing the full extent of the area you would like to generate maps for.
- Create a Map Layout. Include any Map Elements that will be the same on every page of the MapBook. For text elements, use macros to define text that is variable by page. To include the vector feature label, use the Map Title macro. This value will not appear in the text element at first, but can be auto-populated from the vector feature name. Optionally create a second map layout of an alternate page orientation (portrait versus landscape) if there features that would fit better in an alternate page orientation. For more information see Handling Features with Opposite Orientation.
- Using the
 digitizer tool or the attribute editor select the vector features to generate page extents from. Use the CTRL key modifier to select multiple features of interest.
 - Create a Feature MapBook from the Map Layout Editor toolbar or file menu. Choose the layout to use as the (main) template, and what elements to duplicate on every page.
- On the Feature Options tab, specify how to determine the bounds of each page that focuses on a selected feature. The choices here provide options to derive the bounds from the feature extent, or to use a consistent map scale while centering on each feature.
- Once the MapBook has been created, interact with each page individually to make any modifications. You can also go back to the main application and load additional data that will be displayed in the Map View Elements.
Feature Options
The Feature Options tab contains options related to how the selected features will be used to determine the map bounds and orientation for each page. Each page of the MapBook can have bounds auto-generated based on the extent of the selected features. Alternately, each page can centered on the feature of interest while maintaining the same map scale across each page of the MapBook.
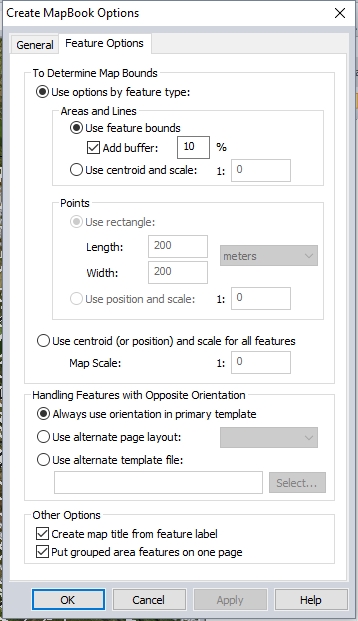
To Determine Map Bounds
Select from the following choices to determine the map bounds for each selected feature:
- Use options by feature type — specifying the bounds of the page based on the feature geometry type.
Areas and Lines
Specify options for determining the bounds for area and line features. If no areas or lines are selected, this section will be disabled.
Use feature bounds uses the bounding rectangle of the selected area or line feature as the map bounds.
Optionally, add a buffer as a percentage of the width and height of the bounds. The entry field for the percentage will be enabled when the Add buffer box is checked. The value must be between 0 and 100.
Use centroid and scale indicates to use the center of the feature bounds and the specified map scale to determine the page bounds. The entry field for the scale will be enabled when the Use centroid and scale radio button is selected. The scale value must be greater than zero.
Points
This section determines the bounds for point features. If no points are selected, this section will be disabled.
Use rectangle allows the user to specify a rectangle around the position of the point feature. The user must enter the length and width, and choose the unit from the list. All of the entry fields will be enabled when the "Use rectangle" radio button is selected. The length and width values must be positive numbers.
Use position and scale tells GM to use the position of the point and a scale value to compute the map page bounds. The entry field for the scale will be enabled when the "Use position and scale" radio button is selected. The scale value must be greater than zero.
- Use centroid (or position) and scale for all features — the center of the bounding rectangle and a scale value will be used to determine the map bounds. The Map Scale entry field will be enabled when this radio button is selected. The scale value must be greater than zero.
Handling Features with Opposite Orientation
Choose the initial template layout on the General tab. That layout will have an orientation of Portrait or Landscape. This section describes how to handle computed feature bounds that have the opposite orientation with respect to the initial template.
- Always use orientation in primary template— use the initial template, regardless of the orientation of the feature bounds.
- Use alternate page layout— use a second layout from an existing page, for features with the opposite orientation. This layout must have already been defined before starting the MapBook creation process. The list will be enabled when this radio button is chosen, and the user must select a layout from the list.
- Use alternate template file — use a saved layout template for features with the opposite orientation. This template must have already been defined before starting the MapBook creation process. The Select button will be enabled when this radio button is chosen, browse the file system to pick a template file.
Other Options
Create map title from feature label — use the feature label to create a map title. This title will be used in the list of map pages, and can be used in a text element by way of the Map Title macro (%TITLE%).
Put grouped area features on one page— indicates that, if an area feature is part of a group, all of the features in that group will be shown on one map page.