 Create Line Features (Vertex Mode)
The basic line creation mode will add vertices where a left-click occurs on the map. The feature is completed with a right-click.
Select  this option from the Digitizer Toolset, or from the Digitizer menu under Create Line Features.
After selecting the Create Line Feature (Vertex Mode) button, proceed to draw a new line feature with the mouse. To draw the feature, left click to drop a vertex. To finish the line feature, right click at the desired location of the last vertex. To cancel, press the Escape ESC key. Note that while drawing the line in Vertex Mode, the Snapping feature can be used to help align the line with existing features.
Create Line Features (Vertex Mode) may also be used to create features in the 3D viewer by snapping to existing vertices or terrain. For more information see Create New Feature in 3D with Vertex and Terrain Snapping.
 Create Line Features (Trace Mode)
A line can also be drawn using the Create New Line/Area Feature (Trace Mode) . This mode will automatically add vertices as the mouse moves, which is good for creating more detailed lines with many vertices, such as tracing a boundary on an image.
Select  this option from the Digitizer Toolset, from or the Digitizer menu under Create Line Features.
To draw the feature, simple press the left button to start the line, then trace the path to draw using the mouse while keeping the left button pressed. To finish the feature, release the left button. To cancel, press the Escape key or just release the left button and press Cancel on the dialog that appears. If using a digitizing table select this mode, then press down the pen to start, trace the path, then release it to end. If the drawn path is nearly closed, the user will be asked whether to create a closed area feature from the path or just keep it as a line feature.
Once the line is completed, the Modify Feature Info dialog will appear allowing the user to setup the label, classification, drawing style, and attribution for the line. The length of the line feature will be added as a default attribute. The units for the length measurement can be modified on the General tab of the Configuration dialog. See Editing Feature Attributes and Drawing Styles for more details.
Once creating the line is completed, the Digitizer Tool will remain in the line creation mode, so you can simply start left-clicking to draw another line, or right-click to choose a different mode.
You can also create new line features from selected area features by selecting one or more areas, then right-clicking and selecting the Advanced Feature Creation Options -> Create New Line Feature(s) from Selected Area Feature(s) menu command. This will create a single closed line feature from each selected area feature.
See also Create Area Features from Equal Values for more automated digitizing of boundaries from images.
Keyboard Shortcuts
- CTRL + Z - Undo the vertex placement
- ALT - Modifier with left-click to disable automatic snapping behavior
- V - Modifier with left-click to only snap to existing vertices
- ESC - Cancel feature creation
Create Line by Connecting Selected Point Features
To create a new line feature by connecting selected point features, select the point features with the Digitizer tool, then right-click and select the Advanced Feature Creationor Create Line Features sub-menu option Create Line from Selected Point Features.
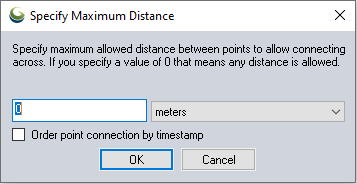
This will find a path from the selected points (starting at the first selected point and then adding the closest point to each end until all of the point are connected), then create a line feature from that path. If the point feature have time values, a checkbox to Order point connection by timestamp will connect points in order by time instead of connecting based on spatial proximity.
Create Arc Line
An arc line is a curved line section, representing some part of the perimeter of a circle.
To create a new arc line, select Create Arc Line from the Digitizer menu under the Create Line Features sub-menu.
The Specify Range of Arc dialog controls what part of the circle perimeter is drawn.
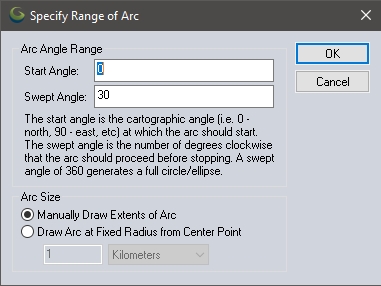
Start Angle - Specify the bearing at which to draw the perimeter of the circle
Swept Angle - Specify how many degrees of the circle to draw. A sweep angle of 360 will draw a line in a circle
Arc Size - There two options for determining the distance of the sides of the arc. Choose the Manually Draw Extents of Arc option to click and drag on the map to dynamically size the arc line. Or specify a distance in Draw Arc at Fixed Radius from Center Point to define the radius the line will be drawn at, measuring away from the clicked location.
Once you hit 'OK' the Digitizer cursor will show the  line cursor. Left-click and hold to set the center of the arc, then drag to resize the arc line. If a fix radius was chosen, just left-click on the map to specify the center of the arc line. Once the shape is finished, release the left mouse button and the Modify Feature Info dialog will appear to specify the label, classification, drawing style, and attribution for the new feature. See Editing Feature Attributes and Drawing Styles for more details.
See also Create Arc Area