 Batch Vector Data Conversions
A Vector Data Conversion Batch can be used to convert multiple similar vector files at one time. To complete a Batch conversion, you must first be familiar with setting up an individual vector data conversion.
Batch Add
To create a new batch of Vector Data Conversion jobs, set up an individual vector data conversion, right-click on the job in the Project Manager and select the option to 'Batch Add...' . Alternately go to File > New > Batch > Batch Vector Data Conversion, the batch will be added to the Project Manager. Then right-click to open the Batch Add Dialog.
This dialog is used to set up multiple vector data conversions at once, all of which share some properties. Once the conversions have been set up, it is possible to change properties of each individual conversion in the Vector Data Conversion Job; this dialog merely handles the initial generation of the jobs.
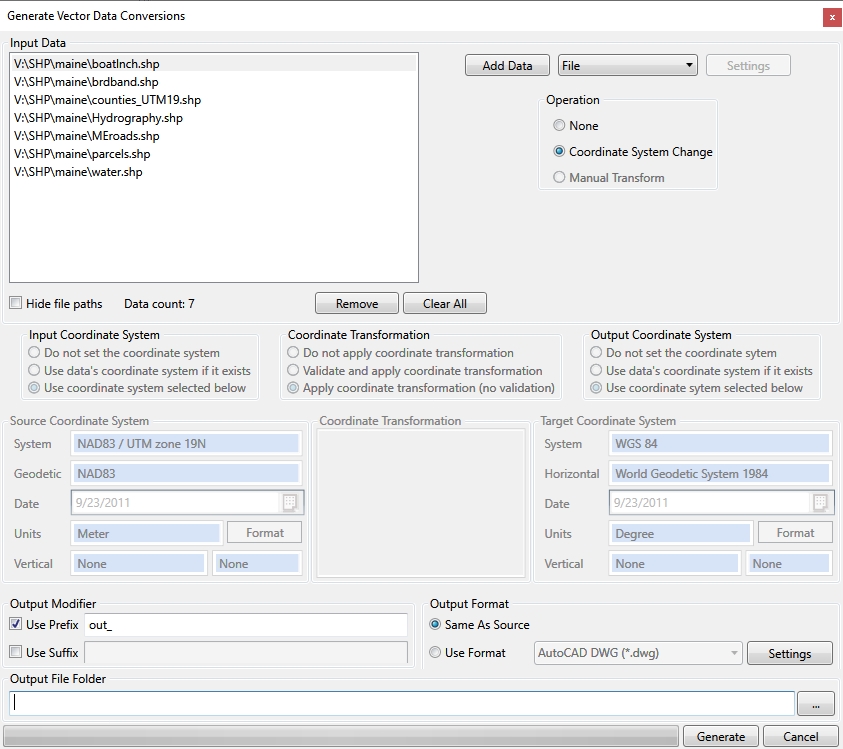
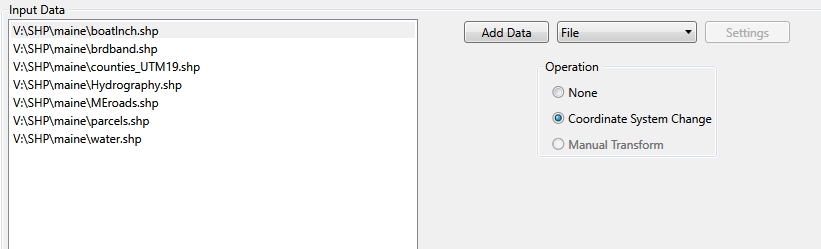
Input Data
When using the Batch Add Dialog, the first step is to specify all of the input data that you wish to add to the job. This is done by clicking the Browse (...) button in the top right corner of the dialog. The selected input datasets will be shown in the Input Data window, and a single vector file conversion will be generated for each of the datasets selected.
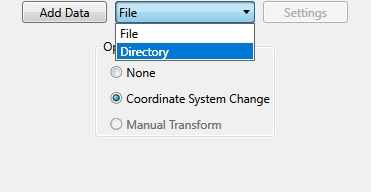
If you want to add a complete directory to your batch, select Directory from the Type dropdown list before you browse. This will allow you to select folders, rather than individual files, when you browse.
Output Files
The next step is to specify the output file settings for the jobs, which are handled by the controls at the bottom of the dialog. If desired, set an output modifier for your output files. If you do not set a modifier, the output file names will be identical to the input file names. Set an output format. You can select either to maintain the same format as the input files, or to use a specified file type for all of the output files. Click the "..." button to set an output folder location for your converted files.

Coordinate System and Transformation Settings
Once the input and output data settings have been established, it is time to set up the coordinate transformation, if desired. By default a Coordinate System Change is selected, however you can opt to have no change by selecting None or to Perform a Manual Transformation. See Vector Scale, Translate and Rotate for more information on manual transformation.

You have the option of setting up various parts of the coordinate transformation in this dialog. You can set up any of the Input Coordinate System, Output Coordinate System, and Datum Transformation. You can also choose to use the data's coordinate system as the input system, if your input files contain coordinate system information. The Datum Transformation area will only become available if you have selected both an input and output coordinate system.
Note: If the input is set to Use the data's coordinate system if it exists, the transformation must be specified on each job in the batch.
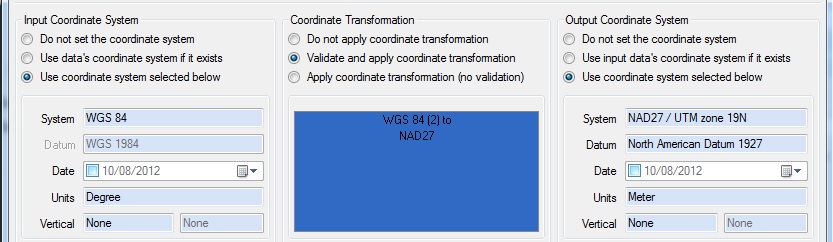
See Selecting a Coordinate System for more information about using the standard coordinate system control, or Selecting a Coordinate Transformation for more information about using the standard datum transformation control.
Generate
After you have completed the input settings, the output settings, and the coordinate system settings, click the Generate button to create the batch. The jobs will appear under the batch node in the Project Manager. You can make any adjustments to particular jobs through the Vector Data Conversion Job Interface.
Process
To run the entire batch, right-click on the batch in the Project Manager and select Process. The Project Manager pane will show the progress of the jobs, and the Messages pane will display information on each conversion as it completes.