Selecting a Coordinate System
To select a coordinate system:
-
By default, the Calculator starts with the geodetic coordinate system of WGS84 selected, or it will automatically recognize the coordinate system from specified input data.
See General Preferences to modify the default coordinate system.
To select a system, double-click on the blue box labeled System in a Coordinate System area.
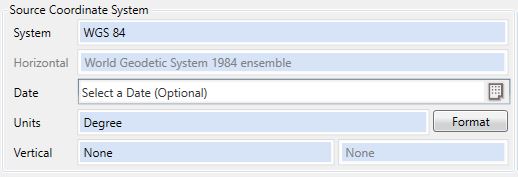
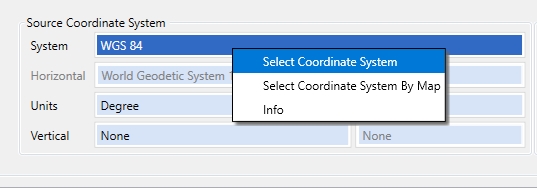
Right-clicking on the blue System box also provides quick options for Select Coordinate System, Select Coordinate System by Map or choose Info to see details about the current system.
-
If this is the first time you have selected a coordinate system, you will be asked if you would like to limit the coordinate systems by geographic area. This option will provide a map display that can be used to build a location filter of the available coordinate systems.
Select No to browse or perform a text search on the full datasource
 The database of geodetic parameters. This includes objects like Coordinate Systems, Datums, Coordinate Transformations, Units of Measure, etc. The Geographic Calculator includes both a built-in default datasource, and a custom datasource, which contains edits and additions made by the user or administrator. of coordinate systems by folders.
 Select Yes to filter the coordinate systems by location selected on the map.
If you would like to be asked this each time, check the Always Prompt option. If you want your choice to be saved for all future system selections uncheck this box. This setting can be modified in your preferences at a later date, as needed.

-
Selecting Yes will open the Coordinate System Selection window. If you do not know the precise name of the coordinate system you are looking for and would like to browse the available coordinate systems for a specific area, you can define a point or an area on this window using the Select Coordinate System By Rectangle
 tool or
the Select Coordinate System
by Point
tool or
the Select Coordinate System
by Point  tools found on the Coordinate
System Selection window's toolbar. The Y and X values for the cursor location (Latitude, Longitude) will display in the bottom of the dialog.
tools found on the Coordinate
System Selection window's toolbar. The Y and X values for the cursor location (Latitude, Longitude) will display in the bottom of the dialog.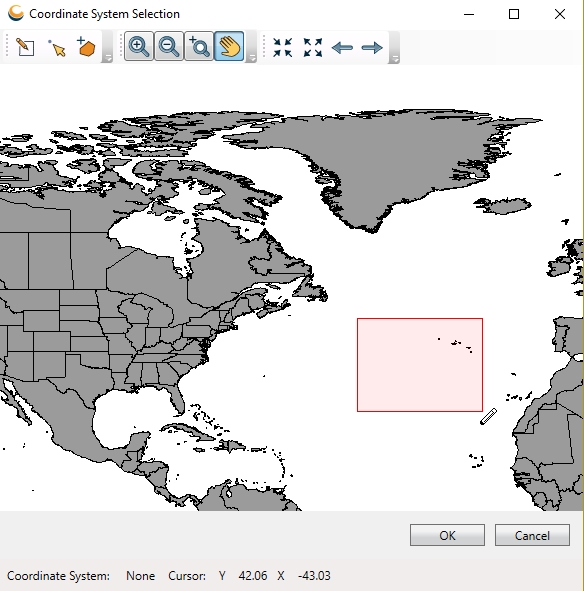 Selecting a coordinate system by rectangle will result in a list of
coordinate systems that contain
the boundaries of the polygon defined with the Select
Coordinate System By Rectangle tool. Press and drag on the map to create a rectangle, then release to complete the rectangle. Selecting a coordinate
system by point will result in a list of coordinate systems that overlap with the point generated
using the Select Coordinate System
by Point tool. Left-click on the map to place a point. Left-click again to move the point to a new location.
Selecting a coordinate system by rectangle will result in a list of
coordinate systems that contain
the boundaries of the polygon defined with the Select
Coordinate System By Rectangle tool. Press and drag on the map to create a rectangle, then release to complete the rectangle. Selecting a coordinate
system by point will result in a list of coordinate systems that overlap with the point generated
using the Select Coordinate System
by Point tool. Left-click on the map to place a point. Left-click again to move the point to a new location.  You may also use the Select Coordinate System By GeoCalc Polygon tool to import a polygon Area of Use An area of use is a polygon that defines the applicable extent of an object in the datasource, such as a coordinate reference system or transformation.They are defined as both a polygon and a minimum bounding rectangle in Latitude / Longitude coordinates in WGS84. from an object
defined in the Datasource The database of geodetic parameters. This includes objects like Coordinate Systems, Datums, Coordinate Transformations, Units of Measure, etc. The Geographic Calculator includes both a built-in default datasource, and a custom datasource, which contains edits and additions made by the user or administrator.. Clicking this tool will bring up a Select
Area of Use from GeoCalc Datasource Object dialog.
You may also use the Select Coordinate System By GeoCalc Polygon tool to import a polygon Area of Use An area of use is a polygon that defines the applicable extent of an object in the datasource, such as a coordinate reference system or transformation.They are defined as both a polygon and a minimum bounding rectangle in Latitude / Longitude coordinates in WGS84. from an object
defined in the Datasource The database of geodetic parameters. This includes objects like Coordinate Systems, Datums, Coordinate Transformations, Units of Measure, etc. The Geographic Calculator includes both a built-in default datasource, and a custom datasource, which contains edits and additions made by the user or administrator.. Clicking this tool will bring up a Select
Area of Use from GeoCalc Datasource Object dialog.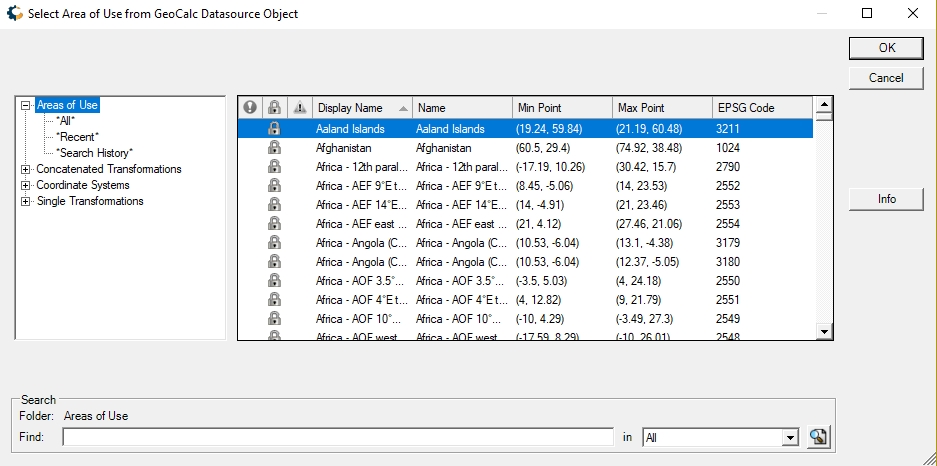
From this dialog, you may select one of several types of objects, including specific Areas of Use, or Concatenated Transforms, Single Transforms, or Coordinate Systems that have associated Areas of Use. Once you have selected a particular object and click OK, the Area of Use associated with that object will be imported into the Viewer and displayed atop the world map, to be applied as the limiting polygon.
Example
In this example the Areas of Use folder is selected and searched for North Sea (by entering in the Find field at the bottom of the dialog).
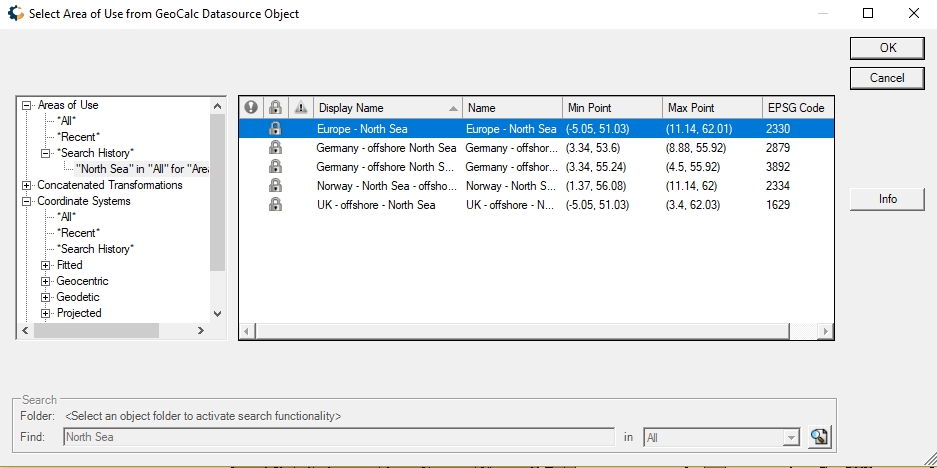
After selecting the appropriate Area of Use, the polygon displays on the map:

After confirming the polygon by clicking OK, the available Coordinate systems are filtered to only those that can be applied to every location in the North Sea.
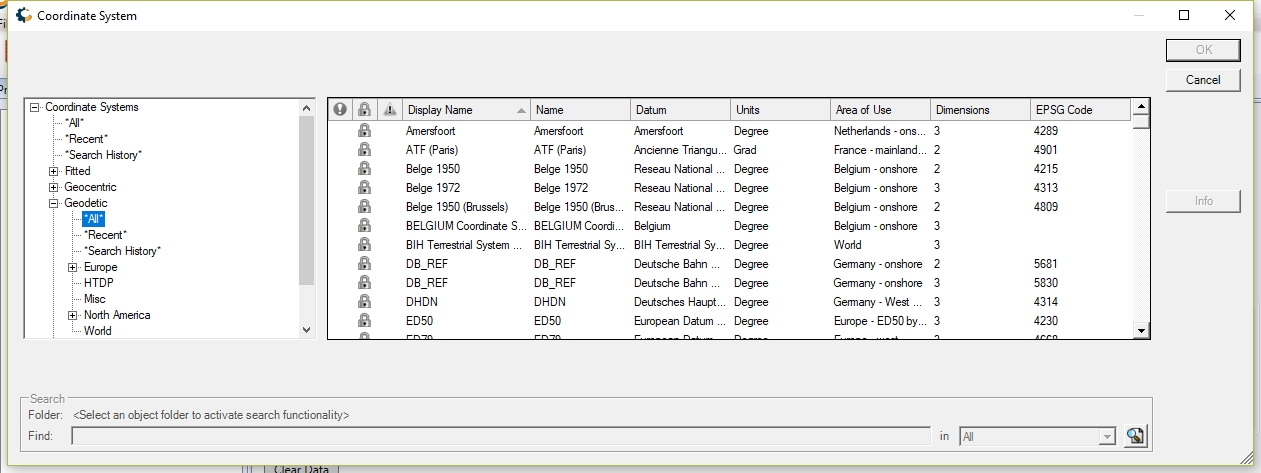
If you select OK after defining your selection or you choose No in step 2 the Select Coordinate System from Datasource dialog will open.
-
In the Select Coordinate System dialog, coordinate systems are organized in the folder list on the left by type (Geodetic (Lat/Lon), Projected, Geocentric
A geocentric coordinate system is a 3-dimensional coordinate system represented by X,Y,Z coordinates. The origin of the system is the center of the earth.This is also refered to as earth-centered, earth-fixed (ECEF)., Fitted A local survey grid or engineering system paired with a polynomial transformation to relate the system to a known geodetic or projected system. The transformation may be calculated by minimizing the error for a set of control points that define coordinates in both the local system and a known system., and String A grid coordinate system where the coordinates are represented as an alpha-numeric string.), continent,
then by country and smaller political sub-units. If a coordinate
system covers an entire continent, it will be found by clicking on
the continent folder itself. Universal Transverse Mercator (UTM)
systems are given their own top level groups. If you are unable to find your desired coordinate system, try using the search tool in the upper left corner, above the list of folders. Once you have found and selected your
desired coordinate system, click OK
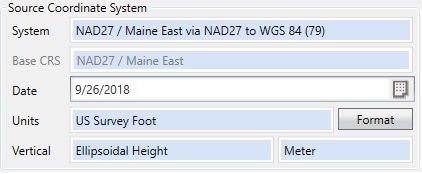
to return to the Job page and you should see the name of the selected coordinate system in the clue box labeled System.Early Bound Coordinate Systems
If you have selected an Early Bound CRS you will see a new identifier called “Base CRS” which provides reference to the primary Late Bound coordinate system used in the Early Bound. This is the only visual difference between the two types of system on the job, until you select a Coordinate Transformation. When you use the EBCRS for a coordinate transformation, you will see the exact transformation object defined and used to move from the local datum to your pivot system.
Early Bound CRS will only be available for use in Interactive Conversion, Point Database Conversion, Derive Datum Shift, Vector Conversion, Seismic Survey Conversion, Seismic Survey Quality Control, and Raster Conversion jobs.
-
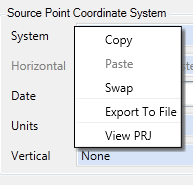
Right-click on the blue System box that lists the coordinate system to see additional options, including Copy, Paste or Swap source and target systems. There are also options to Export to File (*.prj, *.wkt, *.wkt2, *.gml) or View PRJ to see the WKT definition.
-
To use a Horizontal Time Dependent Positioning (HTDP) transformation, select the appropriate date for your Source data and the Target date for your output. Time-dependent transformations can be enabled or disabled in the General Preferences
If you would like to select a 14-parameter transformation, select the date for the Target coordinate system. The Source date should be left blank or set to the same date as the Target.
-
To include vertical (height) data, double-click the Vertical box to select a vertical reference system.
-
Repeat this process to select the target coordinate system for the job, if applicable.
Note: If the target coordinate system is a fitted coordinate system, the coordinate reference will be excluded from most output files, including las, shapefile, tiff, etc.