Point Conversions - Forward Calculation
The Point Conversion tool allows single-point calculations of numeric coordinates. There are three different transformation types that can be performed using a single point: Conversion, Forward, and Inverse. This page describes the Point Forward Calculation.
Forward Calculation
A forward calculation is used to compute a new coordinate that is a given distance and azimuth away from a starting coordinate. Forward calculations follow one of three paths: Geodesic (Great Circle), Rhumb Line (constant azimuth), or Grid distance (valid only for projected coordinates).
Note: For both Forward and Inverse conversions, when height values are entered, the distance is scaled to a height above the ellipsoid.
Requirements:
Setting up a Forward operation is similar to the Conversion operation, except the line calculation method (Geodesic, Rhumb, or Grid) needs to be selected rather than transformation parameters. To complete a Forward calculation, you will need the following:
-
A starting coordinate and its coordinate system
- Specified Target Coordinate System on the same Datum as the starting Source system
-
Distance and Azimuth ahead from the starting coordinate
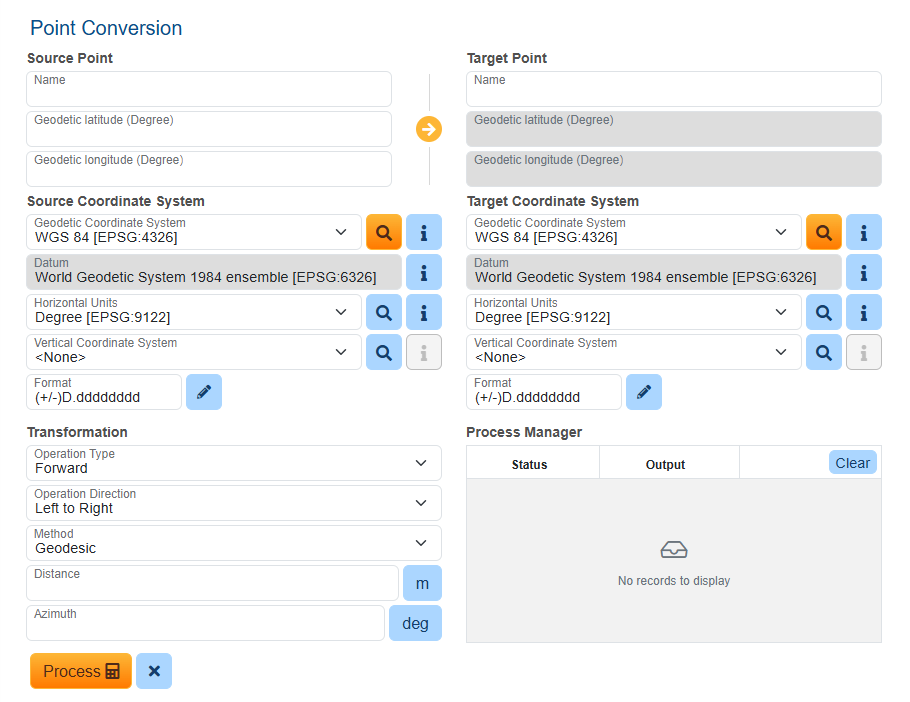
How to set up the Forward Calculation for Point Conversion:
- Under Source Point, enter a name (optional) and the coordinates for the source point.
- Under Source Coordinate System, select the coordinate system that corresponds to the coordinate to be converted.
Use
 to search the Datasource. The Select Source System dialog will display, and you may narrow the search by entering a search string into the Search field or browse the Coordinate Systems folders. Use the i icon to see information on each CRS. For more information on choosing a Coordinate Reference System (CRS) see the Datasource Search.
 The default Source Coordinate System is WGS 84 [EPSG:4326], but recently used coordinate systems will populate the Source Coordinate System dropdown.
- The units for the source and target systems will be automatically populated with the units defined in the selected objects. You may optionally use to search for and change the source or target units for the calculation.
- The units for the source and target systems will be automatically populated with the units defined in the selected objects. You may optionally use
- To perform a vertical transformation, additionally set the source Vertical Coordinate System. Use to search the Datasource and select a vertical CRS.
- Once a Vertical Coordinate System has been chosen, the option to input the source point height (elevation) value will appear. The vertical unit can be changed if necessary.
- Format and precision options can be accessed by using
 to launch the Select Format dialog.
  Supported Formats include:
Latitude and longitude accept various input formats beyond decimal degrees. The formats that you can select are shown below with an example (all examples represent the coordinate: South 44 degrees, 30 minutes, 15 seconds):
DD. (example: -44.50416 or 44.50416 S)
DD MM. (example: -44 30.2500 or 44 30.2500 S)
DD-MM. (example: -44-30.2500 or 44-30.2500 S)
DD MM SS. (example: -44 30 15.000 or 44 30 15.000 S)
DD-MM-SS. (example: -44-30-15.000 or 44-30-15.000 S)
DD.MM (example: -44.3025 or 44.3025 S)
DD.MMSS (example: -44.3015 or 44.3015 S)
Packed DMS (example: -44301500 or 44301500S)
Packed DMS. (example: -443015.00 or 443015.00S)
Packed DM. (example: -4430.2500 or 4430.2500S)
Brazil ANP (example: -44:30:15,000)
The direction (N/S/E/W) can be entered as either a prefix or suffix.
- Set the Target Coordinate System using the same steps as above (remember the target system must use the same datum as the source).
-
Under Transformation, select the Operation Type drop-down to select Forward.
-
Choose a method: Geodesic (Great Circle), Rhumb Line (constant azimuth), or Grid distance (valid only for projected coordinates).
-
Set the Distance. Click the m button to change the Units.
-
Set the Azimuth. Click the deg button to change the Units.
-
- Click Process to convert the point and populate the Target Point definition fields.
Note: The Source and Target fields can be reversed using the arrow button. This reverses the Operation Direction (left-to-right versus right-to-left). The arrow will reverse to indicate the direction.