Label Layer
Labels can be separated into a layer of their own, called a label layer. Because labels in a label layer function much like point features, this option allows the user to have much greater control over the location and style of labels. The Labels tab in the Vector Options window (shown below) for a loaded vector data layer includes the option to "Create a Separate Label Layer," which will enable this feature if selected and applied.
Access the Vector Options window from the Control Center by double-clicking on the layer name, or by using the Layer Options button.

Label Style Options
This opens a dialog for configuring the label properties for the Feature, including Font, background, relative position, size, and rotation.
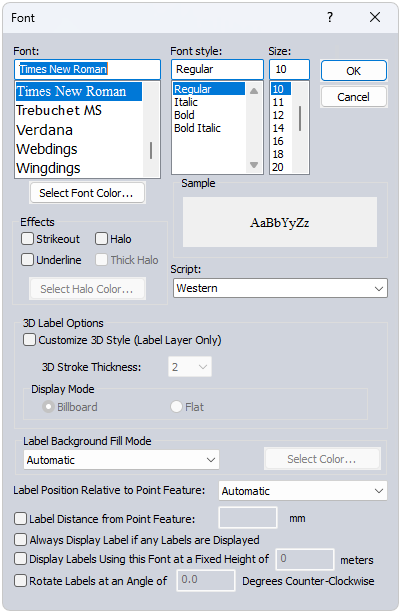
Font
Select the font to use for the label. The list will populate with available system fonts. See also Labels Configuration for default font face and character set.
Effects
Specify text effects, including a halo around the text, a specific font color, or strikeout and underline effects.
Script
Specify the script to use for the label. The available options are dependent on the selected font.
3D Label Options
Customize 3D Label Style (Label Layer Only)
-
3D Stroke Thickness determines the thickness of the text background for labels displayed in 3D.
Display Mode
-
Billboard - The labels will be displayed upright and orient to the camera as the data is moved in the 3D Viewer.
-
Flat - The labels will be displayed flat on the feature and are best viewed from above in the 3D Viewer.
Label Background Fill Mode
Specify how to fill the background for the labels. This setting is overridden by a halo effect.
- Automatic: In most cases this will use a transparent background to the label text
- Opaque - Background Color : Label text box will use the specified background color of the workspace.
- Transparent: No text box fill color for the label.
- Opaque- Custom Color: Use the select color... button to select a custom background text box fill color.
Label Position Relative to Point Feature
Specify how the label is placed relative to the point anchor. The Automatic setting will relocate labels with movement and zoom in order to declutter and reduce label overlap.
Label Distance from Point Feature
When this option is checked, the specified number will be used to calculate the distance away from the label anchor point in pixels based on the current screen resolution. Zero is a valid entry. When the option is not checked, the padding will be calculated as 1/8 of the font height.
Always Display Label if any Labels are Displayed
Objects with this label setting checked will maintain priority during label decluttering.
Display Labels using this Font at a Fixed Height in Meters
Use this setting to specify labels in a size relative to a ground unit size, rather than a font size. The labels will shrink and grow when zooming, to always maintain the same geographic scale. This setting can be particularly useful for reference features, such as labels of background area boundaries.
Rotate Labels
Specify the angle to rotate the labels. (This setting is only available for point and area feature labels.)
 Selecting Labels
Once a layer label has been created, labels can be selected with the  Select Labels tool in the Selection Toolbar or the Digitizer Toolset. One or more labels can be selected at once, by clicking directly on them or by dragging to select multiple labels.
Once selected, labels can be moved around by enabling the  Move Selected Feature(s) tool, and then clicking and dragging them to the new location. For convenience, whenever the Select Labels tool is first selected, the Move Selected Feature(s) tool is automatically enabled as well.
In addition to the standard Digitizer options, there are several options specifically for labels that are available in the right-click menu whenever labels are selected:
-
Edit Label Text - This will open a pop-up window to modify the text of the selected label feature.
-
Edit Label Feature Style - This will open a window to change the font and style of the selected label feature.
-
Delete Label Feature - This will remove the label feature in the label layer.
-
Restore Original Position of Label - If you have moved a label around to a new position, selecting this option will bring it back to its original location.
Apply the Attribute Value to Labels
When creating labels, whether as a separate layer or not, there are three options to choose from regarding how the chosen attribute value for the vector data will be applied to the label. These options will appear in a pop-up window (shown below) after any changes in the Labels tab are applied, or after OK is clicked.
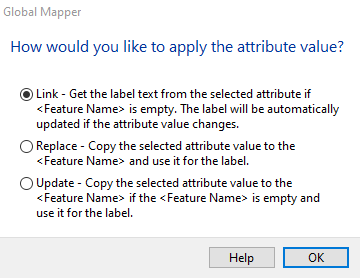
Link - This will get the label text from the selected attribute, and will link the label and attribute so that the label is automatically updated if the attribute value changes.
Replace - This will copy the selected attribute value to the <Feature Name> field, and use it for the label.
Update - This will copy the selected attribute to the <Feature Name> field, and use it for the label, only if <Feature Name> is empty.
Note: For more information about all of the options available in the Layers tab of the Vector Options window, please see the Labels Tab page.