 Feature
Info Tool
Feature
Info Tool
The Feature Info Tool allows users to select a vector feature or pixel in raster data to view additional information on the feature or pixel. Selecting the Feature Info Tool makes it the active tool. When the Feature Info Tool is active the cursor will change to an information icon on the map and the toolbar button will remain highlighted.
Enable the Feature Info Tool from the Tools Menu, with the Feature Information button from the Tools toolbar, or with the Alt+P keyboard shortcut.
This tool allows you to select vector features (areas, lines, and points), mesh features, and raster pixels by clicking on or near them. Once selected, a dialog displaying information about the selected item appears. The types of information and selectable features can be limited or expanded.
The Feature Info tool can also be used in the 3D Viewer to display information on vector and point cloud layers. Features selected in the 3D Viewer will also be selected in the 2D view, but not vice versa. The 3D viewer version of the tool doe not yet support using right-click to cycle through adjacent features.
To pick objects, select Feature Info from the Toolbar. Press and release the left mouse button near the object(s) to be picked.
Holding down the 'P' key when left clicking causes only point features at the clicked location to be considered, similary with A for areas and L for lines.
If left-clicking on a picture point with an associated image, by default just the image will be displayed, but holding the CTRL key when clicking will cause the normal feature info dialog to be displayed.
When an object is picked, it will be highlighted and a feature info dialog (picture below) will be displayed. Right-clicking the mouse button cycles through each of the elements located near the selection point, displaying the information in the dialog box.
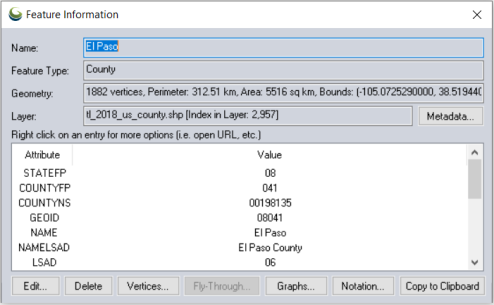
The object's name, description, geometry information including length and enclosed area (when applicable), attribute value list, and map name, are all displayed.
Attribute List
Right-click on any attribute value to see additional options specific to
the selected attribute and attribute value pair*.
Copy Selected Attribute and Value to the
Clipboard - Copies the attribute value to the clipboard.
Open Selected Value as Internet URL
- Will insert the attribute value into a browser, as if a valid URL.
Download File from URL and Load as New
Layer - Will use download link for file, download the file and
add as a new layer in the workspace. Must be a File Type supported by
Global Mapper for use as a layer.
Open Selected Value as File in Windows - Opens the file linked in the attribute value in Windows. Must be a Windows recognized file type.
If the selected
feature has an attribute named IMAGE_LINK and the value of that attribute
refers to a local image file, Global Mapper will automatically open that image in the associated
application, the Ctrl button can be held down to select the feature
and to specify another application to view the image in. An attribute
named GM_LINK with the attribute value referring to a local file, will
prompt Global Mapper to try and open that file in the current instance
of Global Mapper
as a new layer.
Create New Line with Dist/Bearing/COGO Input from Point - Opens the Coordinate Geometry Input tool to draw a line using distance and bearing from point.
'Zoom Map View to Feature Bounds' will zoom the main map view to the extents of the selected feature. The 'Set Current View Projection from Selected Attribute Value' allows the user to export projection to a separate file from a WKT projection string stored in a feature attribute field.
Show Attribute Value in Second Window will show the selected attribute and value in new dialog. The presence of the \n or \r string will break the attribute value into multiple lines for display in the second window, \t will add a tab space in the attribute display.
Buttons
Metadata
Click the Metadata button to see metadata about the object’s layer. This dialog also includes the layer's histogram and projection information.
Edit...
This button opens the Modify Feature Info dialog for the user to edit the selected feature's attribute information, layer, and drawing style.
Delete / UnDelete
This button marks the selected feature as deleted. If a feature is already marked as deleted, the button will change to allow for undeleting. Deleted features can be displayed using the Digitizer Options.
Location...
For point features the location button will be displayed allowing viewing and modification of the location of the point feature.
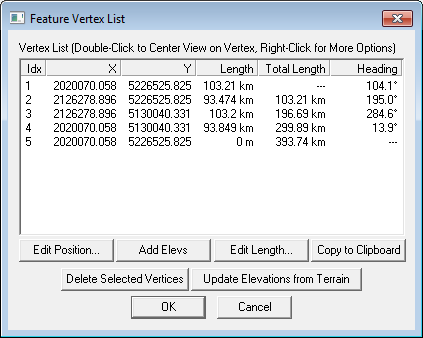
Vertices
Clicking
the Vertices button for line or area features displays the Feature Vertex
List dialog (pictured below), which allows the user to view, edit, and
remove the individual vertex coordinates, including Z and timestamp values
(if present) for the selected feature.
The X and Y coordinates are listed in the native projection of the layer,
and the Z coordinates will have the elevation units defined for the layer
on the Projection tab of the Options dialog for the layer. The user can
also easily add per-vertex elevation values to features that do not already
have them by pressing the 'Add Elevs' button on the Feature
Vertex List dialog.
If timestamp values are present (like for a GPS tracklog), speed and bearing
columns will also be displayed for each leg of the feature. Right-clicking
on the vertex list for a feature with per-vertex elevations will allow
the user to choose the option to evenly spread the elevations to achieve
a constant slope between the first and last elevation on the feature and
also to replace any zero elevation values by interpolating between non-zero
values.
Add and edit per-vertex timestamps by right-clicking on the vertex list and selecting the appropriate option.
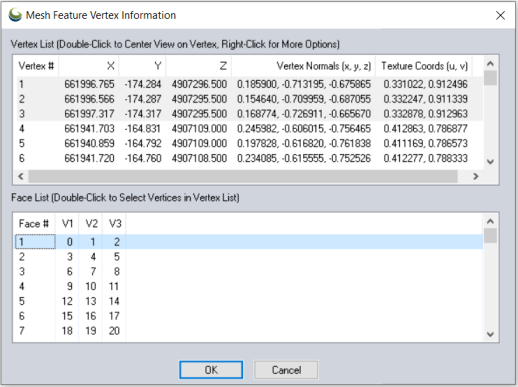
For mesh features the vertices are listed with the coordinates, vertex normals and texture coordinates. Additionally, the faces of the mesh are listed with the face vertices noted.
Fly-Though Path...
For line features, the button is available to view of set up a fly-through path.
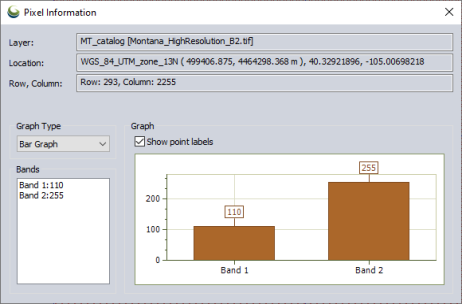
Graphs...
Graphs can be displayed or created from the selected features. See more information about creating Graphs and Charts.
Copy to Clipboard
This button will copy all of the feature information (as text) and the feature itself to the Windows clipboard. It can then be pasted elsewhere, such as in a text editor or as a new feature in a running session of Global Mapper.
View Notation...
This button displays notations that have been created for features in a text editor format or the COGO tool. See more information about feature notations.
To select the type of information that
will be selected with the Feature Info tool, select the Feature Info tool
and right-click on the main map view window (with no features selected).
A context menu containing the following options will be displayed:
Clicking on the menu item will toggle the inclusion of the associated feature
type when using the Feature Info tool.
Additional modifications can be made from the
Control Center.
If you right-click on a raster layer in the Control Center, a context menu will allow you to select the option to 'Allow Feature Selection/Search from Selected Layer(s)'. Clicking on this menu item will toggle the capability to select raster pixels in the Feature Info tool for the associated layer.
Special Info Tool Behavior
*When you initially select a feature that has an attribute value of a URL
or external file link with the Feature Info Tool, you will be prompted
to select a handling method from a drop down menu in the 'Link Attribute
Handling Dialog' (below).
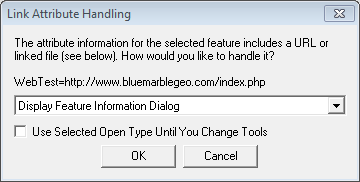
You will be prompted to choose one of the following options:
- Display the Feature Information
- Open Selected Value as Internet URL
- Download File from URL and Load as New Layer
- Open Selected Value as File in Windows
- Open Selected Value as File in Global Mapper
Handling of these attributes may then be applied to other features with links as attribute values, and alternate handling may still be employed by feature from the right-click menu in the Feature Info Tool.
Feature Info Tool Keyboard Shortcuts
| ALT+P | Select the info tool as the current tool | |
| P | Toggle only selecting point features | |
| RIGHT CLICK | Cycle through the features at the clicked location | |
| CTRL | display feature info and ignore alternate link options | |