Selected Layers Context Menu
This is a list of the options available by right-clicking on a selected layer or group in the Control Center. You can select a layer by clicking on its name. Multiple layers can be selected using the shift and control keys while clicking on layers in the list.
Many of the options that were previous located here have been moved to the Layer Menu or the Current Workspace right click menu.
Double-clicking on a layer automatically brings up its Options dialog. If you hold down the 'M' key while double-clicking, the Metadata dialog for the layer will be displayed instead. Pressing the delete key after selecting layers will automatically unload the layers from the workspace.
Right-click on the selected layers to display a list of options available to perform on the selected overlays. Examples of available options include the following:
Options.... (Double-Click)
Metadata...(Double-Click + M)
 Close (Unload) Layer(s)...(DEL)
Remove the selected layers from the workspace.
Invert Selection
This option switches the currently selected layers in the Control Center.
Search Layer Descriptions
Search selected layer names in the Control Center. Layers matching the search variable will be selected, all others will be unselected.
Layer Attributes
Reload Selected Layers
Reloads the selected layers to reflect any changes to the source file(s) for that layer that were applied after they were originally imported.
Automatically Refresh Selected Layer on Change
Automatically refresh the contents of a loaded layer when the source file changes.
 ZOOM_TO - Zoom to Selected Layer(s)
This causes the view to be zoomed such
that the full extents of the selected overlays are visible.
For additional Zoom options, see the Zoom To section in the View Menu.
GROUP - Set Group to Assign to Selected Layer(s)...
Specify a group to assign the selected layer(s) to. This brings up a dialog to name the group the group for the selected layers. If layers are in a group, they will be organized under that group name in the Control Center and can be easily collapsed into a single item. With a group, the group right-click context menu provides options that operate on all items in the group.
The drop down list will populate with existing group names.
To create multiple levels of nested grouping, insert the word <sub> in between the level names.
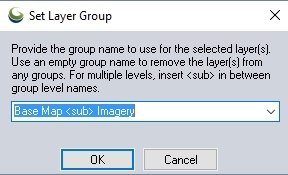
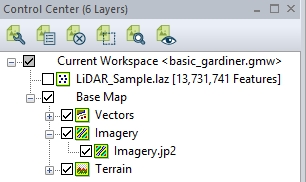
In the above example, the control center would contain a group Base Map, with a subgroup Imagery.
DESCRIPTION - Edit the Selected Layer's Description...
This allows renaming the layer. Clicking on a selected layer will also allow editing the layer name. The Layer Description is used in a Legend.
Open Selected Map Folder in Windows Explorer...
This causes the Windows Explorer application to be opened to the folder containing the selected map file.
 SELECT - Select All Features in Selected Layer(s) with Digitizer Tool
This option causes all features in the selected layer(s) to be selected with the Digitizer Tool.
Allow Feature Selection/ Search from Selected Layer(s)
This option controls whether or not vector features from this layer can be selected using either the Feature Info or Digitizer Tools. These layers will be red in the control center.
Allow Export From Selected Layer(s)
By default this option is selected for all layers, un-checking the option will omit the selected layer from any exports. These layers will then show in a different color in the Control Center list.
RECTIFY - Modify Layer Position/ Projection (Re-Rectify)
Use this option to modify the position of a layer using rectification, or to update the existing rectification.
SHIFT - Shift Selected Layer(s) a Fixed Distance or Transform Coordinates...
This option provides a quick way to shift any layer some fixed distance in any direction or to shift layers based on a transformation described in a control point file or via a transformation dialog. When selected a dialog is presented allowing you to select the type of transformation to perform. The following options are available:
-
Shift Layers a Fixed Distance - presents a dialog allowing you to specify the distance to shift the selected layers in the X , Y and/or Z direction or some distance along a particular bearing. For more information see Shift/ Offset Selected Feature(s). Click Apply from this dialog to apply the shift to the layer(s) without closing the dialog.
-
Transform Coordinates Based on File - you will be prompted to select a control point file describing a transformation from the current coordinate system of the file to some new coordinate locations. The file should be a simple comma-delimited text file with each line describing a transformation as follows: current_x,current_y,new_x,new_y. There must be at least 2 transformation lines specified.
-
Specify Coordinate Transformation - allows you to specify a generic coordinate transformation with an offset, scale, and rotation about some point. The information provided should be in the same coordinate system (projection) as the workspace. The source point will be updated using a coordinate transform to shift a layer to expect values in the current display projection, rather than the native layer projection.
-
The coordinate transformation defined in this menu can be saved to a .gm_xform file. If the gm_xform file is saved in the same folder as a vector file and has the same name (i.e. Name.gm_xform in the same folder as Name.dxf), then when the file is imported into Global Mapper, that transformation will automatically be loaded and applied to the coordinates in the file.
-
Scale Layer Based on Actual Length of Selected Line
This option allows you to scale a selected layer based on a user-specified length of a selected line feature in that layer. This is useful if you know the actual length of a line feature in a vector layer and want to scale the layer so that the line length is correct without caring about where on the earth the layer is placed. The line that you know the length of should be selected with either the Feature Info or Digitizer Tool.
Set View/ Export Projection to Selected Layer Projection
This option will update the projection that the map is displayed in to match the currently selected layer. The display projection is also the projection used for any exports (that don't require an explicit projection). The current display projection is visible in the bottom bar of the application, and can also be manually changed from the Configuration.
Draw Boundaries of Missing Online Layer Tiles
Select this option to display tile boundaries with names (zoom, Y, X) when no data is downloaded from the online source. This options helps to troubleshoot problems with custom added online sources.
Edit View Shed Parameters and Recalculate
This allows you to edit the calculation parameters for a view shed layer and then update the results.
Change View Shed Layer Color
This allows you to edit the color used to display the coverage area for a selected view shed layer.
Layer Order >
The Layer Order sub-menu provides options for moving the currently selected layer(s).
Reorder Maps by Description/ Resolution/ Location...
This option displays a dialog allowing you to choose a method by which to reorder the maps in the list. This includes sorting alphabetically, by resolution, or spatially sorting the maps.
Move Selected Layers After Another Layer...
This option allow you to modify the order in which overlays are displayed in the main view. This can also be achieved by dragging the layers.
Reverse Order of Selected Layers
This option will invert the order of the selected layers using the same overall layer positions. It will leave any unselected layers in their current position.
Move Selected Overlays to Top of List (Draw First)
This option moves the currently selected layers so they draw first in the display.
Move Selected Overlays to Bottom of List (Draw Last)
This option moves the currently seleted layers so they draw last in the display.
Analysis >
Links to a few of the available Analysis options.
Layer >
Create Workspace File from Selected Layer(s)
This option will generate a workspace of user-selected layers and settings. This workspace can later be loaded with the Load Workspace option in the File menu.
EXPORT - Export Layer(s) to New File
This option will bring up a dialog to specify the export format. All selected layers in the Control Center that are compatible with the export format will be included.
EXPORT - Export Embedded Files
Exports embedded files often associated with data collected in Global Mapper Mobile (images, voice memos, etc.).
MAP CATALOG - Add Selected Layer(s) to Map Catalog...
Adds the selected layer(s) to an existing Map Catalog.See Add Selected Layers to Map Catalog for more information.
Calculate/ Copy Attribute Value(s)...
JOIN - Join Attribute Table/ File to Layer
This allows you to join a table of attribute values, either from a DBF file or from a text file, to the attribute table of a selected layer based on a common value of some attribute. You will be prompted to select the attribute from the attribute table file to join against a user-selected attribute from the selected layers. For text files, the first line must contain the attribute/ column names. Whenever a match is found, the other attributes from the data table are added to the matching record(s) in the file.
Create Label Layer...
Labels can be separated into a layer of their own, called a label layer. Because labels in a label layer function much like point features, this option allows the user to have much greater control over the location and style of labels.
BBOX/COVERAGES - Create Layer Coverage Box/Polygon Area Features

This tool creates a new coverage area feature(s) with the same name of the selected overlay (based on display label) for each selected layer. Areas can be:
- Rectangular (think layer extent)
- Polygonal (adheres to the 2D coverage of the data)
This tool is also useful for creating an image index as the filename of the layer will also be saved as an attribute of the area feature created from it.

Smoothing - When creating polygonal coverage areas a smoothing factor determines how tightly the coverage area matches the features in the layer. Rough area features more closely follow all edges of the data, while Smooth area features round out the edges, hiding inconsistencies in the data and having a better look. When selecting a smoothing factor, any value above zero is valid. Larger values will create smoother areas while lower values will create rougher areas with the possibility of multiple areas being created.
ADVANCED: Use Legacy Concave Hull for Lidar Coverage - This method creates a coverage area that does not leave a small gap around point cloud (the coverage area fits very closely), but takes longer to run and has a chance of leaving a few lidar points outside of the coverage area.
Split Into Separate Layers Based on Attribute Value
This option allows you to create new layers by splitting the selected layer(s) into new layers based on a particular attribute value or by the description, type, or name of each feature. The new layers will be grouped together using the name of the original layer unless the original layer was already in a group. This function is also available in the Layer Menu.
Close Gaps Between Adjacent Features...
Link External Metadata File
This allows you to add an additional tab to metadata that opens the linked file in an internal browser. (XML and html are generally the supported formats)
Save List of Layers to Text File
Exports a text file listing the layers currently loaded in the workspace. The layer descriptions as seen in the Control Center will be used in the resulting text file.
Set Background Color for Layer in Control Center
This option allows you to set the background color for a selected layer or group in the Control Center. After selecting this option, a color picker box will open allowing the selection of a color. To reset the color, reopen the Set Background Color for Layer in Control Center dialog via the Layer context menu, and change the color back to white.
