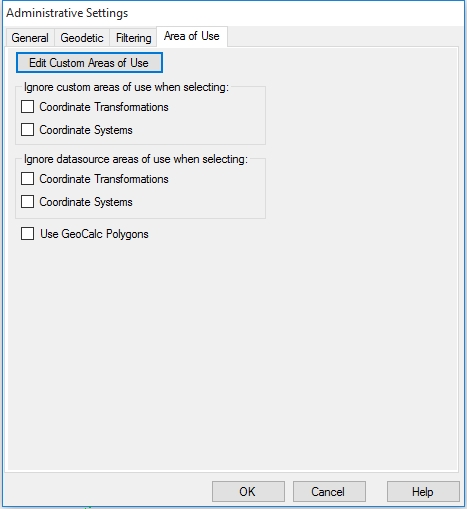
Custom Areas of Use
In addition to the Filtering options, certain objects can also have custom user-defined Areas of UseAn area of use is a polygon that defines the applicable extent of an object in the datasource, such as a coordinate reference system or transformation.They are defined as both a polygon and a minimum bounding rectangle in Latitude / Longitude coordinates in WGS84. associated with them. In the Geographic Calculator, you can draw polygons on a map to create an area of use for particular Coordinate Systems, Datum Transformations, and Horizontal Datums. Once the polygon is set, when a job includes either coordinate values or files in that particular polygon, the Custom Area of Use will narrow down the available Coordinate Systems and Coordinate or Datum Transformations for that conversion.
The Geographic Calculator, by default, contains a set of custom areas of use for common geographic areas. These custom areas of use included by default do not contain any active filtering of Coordinate Reference Systems. They do contain some Transformation filtering, specifically:
- NAD27 to WGS84 in CONUS
- OSGB36 to ETRS89 in UK
- AGD66 to GDA94 in Australia
The administrator can modify or add to these custom areas of use and the filtering associated with them by pressing the Edit Custom Areas of Use button.
Note: The custom and the standard Areas of Use settings can be disabled entirely, by checking the boxes to Ignore Areas of Use.
Note: The Geographic Calculator includes EPSG polygons as predefined datasource Areas of Use, not as Custom areas of Use. You can use these predefined areas of use by importing them from a polygon file, an EPSG polygon file or by selecting any of the OGP defined Areas of Use to create Areas of Use filters.
To set custom Areas of Use:
-
Go to Options>Administrative Settings and open the Areas of Use tab. Click the Edit Custom Areas of Use button.
-
The Custom Areas of Use Dialog will open with World_countries.tab loaded in automatically. This file is the default file selected for use.

-
On the Custom Areas of Use Dialog, you can use the standard navigation tools at the top of the panel to zoom in and out and pan the map view. Once you have zoomed into a particular area you can use the Create New Areas of Use tool
 to
draw a polygon around the area you wish to define as an Area of Use. Click
the button to enable the tool, then simply click around the area to draw
the polygon to define the new Area of Use. Double-click to finish the
polygon.
to
draw a polygon around the area you wish to define as an Area of Use. Click
the button to enable the tool, then simply click around the area to draw
the polygon to define the new Area of Use. Double-click to finish the
polygon.
Note: You can also go to File > Import Polygon Data or Import Custom Area of Use to import a pre-made polygon to the Areas of Use editor.

You can also use the
 Load Area Polygon from
GeoCalc tool to use
a predefined polygon as a Custom Area of Use.
Load Area Polygon from
GeoCalc tool to use
a predefined polygon as a Custom Area of Use. -
When the polygon is closed by double-clicking, the Edit Custom Area of Use dialog will open. This will allow the user to assign this Area of Use a Name and a Priority, if desired.

-
Clicking on the Set Up Filters... button will open the Set Up Custom Areas of Use Filters dialog. Setting up a list of hidden and visible Coordinate Systems and Transformations, similar to setting general Filters, except the Filters set in this process will apply only to the particular geographic areas specified by the custom polygons.

You may wish to mark an entire folder as Hidden. You may do so by right-clicking on the folder and selecting Hide Folder. Note that if you hide an entire folder and then attempt to un-hide objects within it by checking the Show box, the object will remain Hidden because it is inside a Hidden folder. If you want to Show the object you must first Show the folder it resides in by right-clicking on the folder and selecting Show Folder.
-
Repeat steps 2-5 as needed to define your custom Areas of Use.
-
When you have completed editing your custom Areas of Use go to File > Save to commit your changes to the current workspace.

Note: In the case of Datum Transformations, transformations between your local datum and the intermediary datum (defined in the general preferences dialog) will also be accessible by the user. For complete security, either disable the intermediary or hide any transformations between your local datum and the intermediary.
-
Once saved, these filters become a part of the Workspace. For administrative users to lock the Workspace to any of these restrictions, see Password Access.