Raster File Conversion
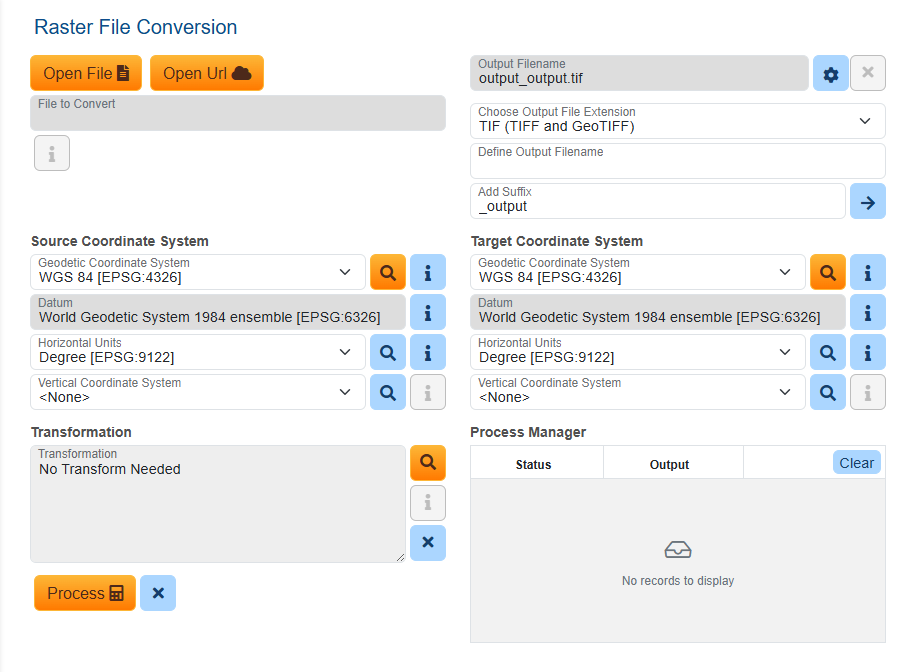
Use the Raster File Conversion tool to process georeferenced images. This tool allows you to perform datum transformation, coordinate reprojection, and file format conversion in a single step.
File Importing
Click Open File to choose a raster file for processing. See Supported File Formats for the list of compatible file types.
After your file has finished loading, click the  icon to open the Raster Preview Window to view the image's metadata and a preview image.
Information on Cloud Storage and Processing
Click Open URL in the Vector and Raster File Conversion tools to connect to data files stored in Azure and Amazon AWS S3 cloud storage accounts.
Data can be transferred directly from and to the cloud account. The size of local files uploaded directly through the browser is limited by available browser memory. Azure cloud storage connections utilize a Share Access Signature (SAS) link method, while AWS S3 connections use a presigned link method.
 Importing Amazon S3 data in v1.1
At this time, presigned links are required for every input file that is loaded via the AWS S3 method, including supporting files.
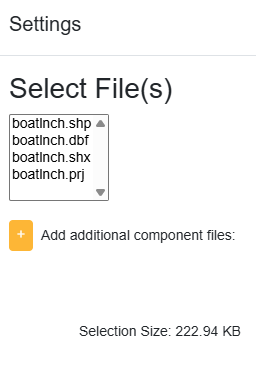
If the Amazon S3 method is selected and a valid presigned link is used, then an option to “Add additional component files:” with “+” button will become available for uploading all needed supporting files. For example, a shapefile loaded via the AWS S3 link method would require separate presigned links for the individual .shp, .shx, .dbf, and .prj files, as seen below:
Output File Options
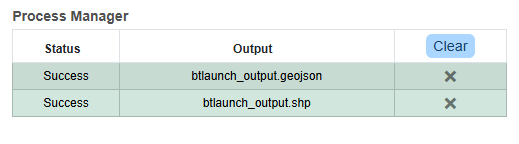
After processing, files are automatically downloaded to your computer in the file location determined by your browser settings. The default option is often the Downloads folder. Consult your browser settings to determine or change the download path. Files are generally stored in the Process Manager up to 7 days, while the user’s session is active.To clear output files from the Process Manager, use the “x” button to the right of each output to remove individual files, or the blue “Clear” button to remove all output files in the list.
-
Output File extension - Choose the desired file format type to export the completed raster conversion data. Only output formats compatible with the input format will be shown. The chosen output format can be the same as the input format.
- Define Output Filename - Leave this field blank unless you would like to change the name of your output file. If left blank, the input filename will be used as the base of the output filename.Use the arrow button to toggle between adding a Suffix or Prefix:
Add Suffix - Use this option to add a suffix to the original file name. The default is "_output".
Add Prefix - Use this option to add a Prefix to the original file name. The default is "output_".
Unlike point and point file conversions, most vector and raster file conversions are not performed in the browser. Files are zipped, sent to, and processed on one of three virtual machines as determined by file size.
Source and Target Coordinate Systems
Select your source and target coordinate systems. If available, the source coordinate system will populate from CRS (Coordinate Reference System) information with the loaded data file. Custom Coordinate Systems can be added in DataSource Settings.
- Under Source Coordinate System, select the coordinate system that corresponds to the coordinate to be converted.
Use
 to search the datasource. The Select Source System dialog will display, and you may narrow the search by text input or browse the Coordinate Systems folders. Use the i icon to see information on each CRS.
- The default Source Coordinate System is WGS 84(EPSG:4326) and this can be changed in General Settings. Recently used coordinate systems will populate the Source Coordinate System dropdown.
- The units for the source and target systems will be automatically populated with the units defined in the selected objects. You may optionally use to search for and change the source or target units for the calculation.
If no horizontal CRS information is found, then the horizontal CRS remains as it was previously set.
- The units for the source and target systems will be automatically populated with the units defined in the selected objects. You may optionally use
- To perform a vertical transformation on elevation data, set the additional source and target Vertical Coordinate System. Use to search the datasource and select a vertical CRS.
Vertical systems or units cannot be chosen if the raster file is not detected to have elevation values.
- In cases where height geometry is detected, but there is no recognized information on a vertical CRS, then the Unknown Vertical Coordinate System will be loaded.
If a vertical CRS is detected in the loaded raster file or from an included external reference file, the cloud application will provide the Vertical CRS system and unit fields.
- In the case that no horizontal OR vertical information is detected when loading the raster file, the application will provide a warning to the user.
- The Date field will display if time-dependent transforms are enabled in settings. Source and Target dates are required for time-dependent transforms to display in the transformation selection choices.
- Set the Target Coordinate System using the same steps as above.
Select a Coordinate Transformation
If you select input and output coordinate systems that are based on different datums, you will need to select a Coordinate Transformation. If no transformation is needed, an alert message stating this will appear at the bottom of the application page. If no valid transformations are found between the two datums, a warning message will display.
Use the Choose Transformation field to search the Datasource and select a valid transformation between the selected Source system and Target system. If no transformation is needed, a message stating this will appear in the display box. If no valid transformations are found between the two datums, the Coordinate Transformation box will display "No Choices". A null transformation "<None>" can be selected by enabling the setting "Allow null transformations ("<None>" option).
-
Use the Search field in the Select Transformation dialog window to limit the results by text string or expand the folders on the left side to select the transformation. The transformations are limited by Source and Target CRS selections (and input coordinate range if AOU filtering is enabled in settings).
-
The Datasource Transformations folder will contain any predefined objects organized into subfolders by transformation type (Concatenated, Datum, and Parametric).
-
The Generated Transformations folder will contain any on-the-fly concatenated transformations organized into subfolders based on the intermediate datums.
-
-
Click on the desired transformation’s name to select it. The Select Transformation dialog window will close automatically and the selected transformation will be shown, in addition to any Vertical Transformation that is selected.
-
Custom Coordinate Transformations can be added in DataSource Settings.
Processing Files
Use the  button to remove the loaded data and reset all options.
Click the Process button to convert the raster data and download the new output file. Output files from finished conversions are listed in the Process Manager. To clear this list, clear your browser cookies.