Initial Wizard
The Pixels to Points Wizard is a tool to help guide users to the appropriate Pixels to Points settings based on their desired outputs. Use this wizard to import and set your image settings, your desired output types, and the wizard will do the rest.
When opening Pixels to Points, from the Tool selector dialog that appears, choose Use Wizard from the dialog that appears.
To choose which dialog the tool opens with, or to always be presented with the Tool Selector, use the Pixels to Points starts as setting in the Configuration Menu under General > Advanced.
Project Set-Up
First, name and determine the location of your output files:
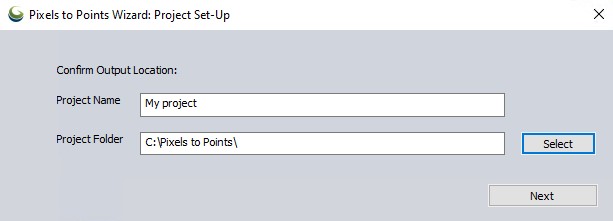
Project Name - Set the name for the completed project.
Project Folder - Select where on your computer the finished .gmp and other related files should be saved. This is also referred to as setting the Project Directory.
Initial Setup
Next, supply the image files and camera information:

Add images - There are multiple ways to bring images into the wizard:
-
Add Image Files to select image files from your computer.
-
Add Folder to import an entire folder of images from your computer.
-
Add Loaded Picture Points to import the images currently loaded in your Global Mapper Workspace.
-
Or, drag and drop images directly into the wizard from your computer.
Remove Selected Image(s) by right-clicking in the list of images and choosing Remove Selected Images(s). Multiple images can be selected by using Ctrl or Shift while clicking.
Image Datum - Supply the datum that was used by the GPS/GNSS device. Typically this information is automatically populated from the image's EXIF / metadata.
Positions from File - If applicable, use this option to select a text file that contains EXIF / metadata information for the imported images. The image file names must be included in the text file for the data to be matched with the proper image file.
Camera Model - Typically the make and model of the camera is automatically populated from the image's EXIF / metadata, but cameras can be added or edited manually with the Manage Cameras button.
Once your settings have been chosen, use the Next button to progress to choosing your desired project type.
Select Project Type
|
|
Use the dropdown menu to select the type of output you would like to generate. Choosing one of these options will help populate the desired options and settings for running Pixels to Points. Additional outputs can be chosen after clicking Next to proceed to the Additional Outputs dialog. |
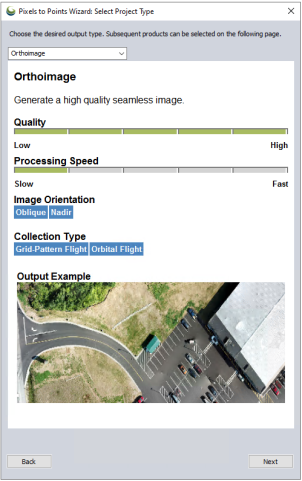
Choose this option if your primary goal is to create a continuous orthoimage of the scene and /or to orthorectify each individual input image. An orthoimage is a seamless, 2D image generated from the input imagery. This method takes more time than the Quick orthoimage option, but it generates a higher resolution output.
Note: An orthoimage output can also be created later from the generated point cloud after the tool has run, using the Create Elevation Grid tool, and selecting a Grid Type of Color(RGB).
The standard orthoimage output is calculated using a binning method of gridding, which selects the color of the highest elevation point for each output pixel. (See the main dialog for an option to generate the orthoimage from the mesh instead).
![]()
Choose this option if your primary goal is to create a 3D point cloud. This dense point cloud will be treated like a lidar point cloud in Global Mapper and may be further processed with the Automated Lidar Analysis Tools. The point cloud will contain the RGB colors from the images and an intensity value that represents the grayscale color value (note this is not a true intensity value since there was no active remote sensing performed).
This option works well with images taken from a top-down nadir perspective (left image below). To increase point density in areas that aren't visible from the nadir perspective, you can optionally include images taken from an oblique perspective. Pixels to points can only construct what it can see.
![]()
![]()
Choose this option if your primary goal is to create simplified and textured 3D mesh output. A 3D Model, sometimes referred to as a mesh, is a solid surface layers created to mimic the terrain and surface collected in the imagery. It’s made of polygons, typically triangles or quadrangles, where each vertex of the polygon has XYZ information. This export requires additional processing time. An orthoimage will also be created by default.
![]()
![]()
Collection Type: Orbital Flight recommended for building/object reconstruction, Grid-Pattern Flight for landscape/scene model
Because 3D Models will be viewed in the software from an oblique perspective, it’s advised that oblique images should also be included in processing. For example, nadir (top down) images won’t capture under the eves or porches of buildings. Structure from Motion can only process what it can see in the images, so without this information there will be holes in the data under the eves and in the porch. Oblique images, taken at an angle, would capture these areas.
Choose this option to quickly generate a low quality orthoimage. This method downsamples the imagery to a lower resolution, and chooses optimal settings for speed. A low quality orthoimage can be used when high (cm) resolution is not necessary, such as a base map or broad land cover mapping.
Choose this option to quickly generate a lower resolution 3D model.
After selecting an output, click Next.
Additional Outputs
In addition to the output chosen in the previous window, select any of the following to be generated in the output:
-
DSM - A Digital Surface Model is a gridded layer representing the highest point in each area based on the dense point cloud. Area size (sometimes referred to as bin size) is set by the resolution option. A DSM is different from a 3D Mesh in that the DSM looks for the highest points and from them creates a grid of square cells, while the 3D mesh is a triangular surface made from key points in the point cloud. A DSM can also be generated post-processing using the Create Elevation Grid tool.
-
Contours - Contour lines are 3D line features that delineate changes in elevation. These contours are generated from a digital surface model. Contours can also be created post-processing from the Generate Contours tool.
-
Sparse Point Cloud - Generates a very sparse point cloud of 1% or less of the original to display the initial point cloud structure before the densification process is applied. When generated in conjunction with the Camera Frustums, the space point cloud will also include:
-
Pose is represented as Green points. These are also generated when the Camera Frustums are not generated.
-
Pose priors are represented as Blue points.
-
Structure points are represented as White points.
-
GCPs, when used through the main Pixels to Points dialog, are represented as Red points.
-
-
Dense Point Cloud - Generates a full-resolution point cloud.
-
Camera Frustums - Displays a representative view of each camera. Frustrums help visualize where the camera was, and its perspective, when the image was acquired.
Output Settings
-
Output Coordinate System - By default, the output files will be projected in the nearest identified UTM zone. Alternatively, use the Select/Add Coordinate System button to select the desired the coordinate system for the output file. If the chosen system is not ideal for the location of the images, the Coordinate System Adviser dialog will give you the option to continue, select a different coordinate system, or cancel.
-
Advanced Settings - Takes you from the Wizard to the full Pixels to Points dialog, where you can add ground control points, apply masking, and change other settings.
Note: The point cloud will use the vertical datum of the camera metadata (typically ellipsoidal height) or the ground control points (if supplied). For vertical datum transformation options, see Coordinate Reference System Configuration.
Save as Template
This option allows you to save a template of your Pixels to Points processing settings, including Project Type and Additional Outputs, for future use. Saved templates can be selected from the Project Type drop-down menu.
Click Run to process the images in Pixels to Points.