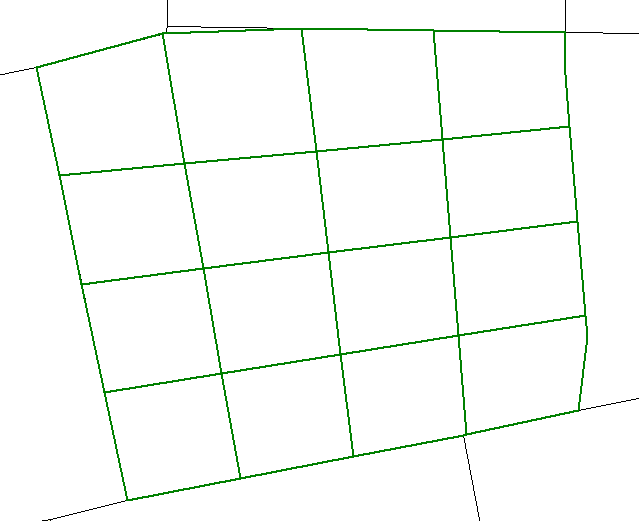
Subdivide Quadrilateral Area
The Subdivide Quadrilateral Area tool will subdivide the selected area features into a number of smaller area features based on the specified grid. Depending on the settings, this may divide the area into orthogonal sections, or equally subdivide horizontally and vertically, where the interior subdivision boundaries will be parallel, but not orthogonal to the projection.
This option is available in the top level Digitizer menu under Advanced Feature Creation andCrop/ Combine/ Split Functions. If one or more areas are selected, the Subdivide
Quadrilateral Area option will also appear in the Digitizer right-click context menu and
in the 3D View context menu.
Once selected, the Subdivide Areas dialog will be displayed. In the Subdivide Areas dialogue (below), a range of areas can be specified - only features with a calculated area in that range will get subdivided. Features larger or smaller than that will be left intact.
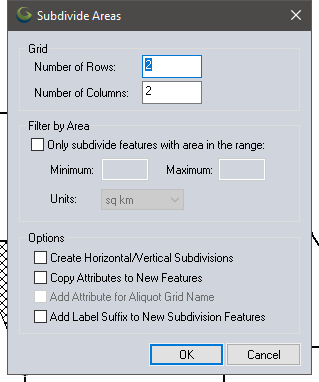
Define the dimensions of the grid by filling in the Number of Rows and
Number of Columns fields. The values must be positive integers. At least
one of the values must be greater than 1.
Filter by Area
This option will only subdivide areas that are more than the minimum and less than the maximum area specified. Place a check
next to Only subdivide features with area in the range to enable this
functionality. Specify the minimum value, maximum
value, or both.
Minimum -
Put the value that represents the minimum area for a feature to be subdivided.
If no minimum value is specified, then all features with an area
less than the maximum will be divided.
Maximum
- Type the value that represents the maximum area that a feature to be divided
can have. If no maximum is specified, then all features with an
area greater than the minimum will be divided.
Units- Select the unit used for the minimum and maximum values.
Options
Check the Create Horizontal/ Vertical
Subdivisions option to produce a grid using purely
horizontal and vertical lines to define the requested number of rows and
columns. In this case, the resulting horizontal and vertical grid lines will be parallel to each other.
If this option is not checked, then Global Mapper will divide the sides that run in a generally north/ south direction into the specified number of rows, and the other two sides (the east/ west sides) into the requested number of columns. Whether or not the resulting grid lines are parallel to each other depends on whether or not the sides of the area are parallel.
If the user selects the Copy Attributes to New Features option, then the attributes associated with the original feature will be copied to each of the subdivisions.
If the Add Attribute for Aliquot Grid Name option is selected, then Global Mapper will add a new attribute representing the Aliquot grid name (e.g., "NWNE", "SENW") to each new subdivision. This option is only available when both the number of rows and the number of columns are set to 4.
If the Add Label Suffix to New Subdivision Features option is selected, Global Mapper will add a numeric suffix to the label for each new subdivision feature. The base value will come from the label on the feature being subdivided. If the label is generated from a single attribute, and the Copy Attributes to New Features option is selected, then that attribute value on the new feature will also contain the suffix.
After the user clicks OK on the Subdivide Areas dialog, the Modify Feature Info dialog will be displayed. This allows set up of the label, classification, drawing style, and attribution for the area. The perimeter and enclosed area of the area feature will be added as default attributes. The units for these measurements can be modified on the General tab of the Configuration dialog. See Editing Feature Attributes and Drawing Styles for more details. The options chosen on this dialog will be applied to all of the new subdivision features created during this operation.
Example
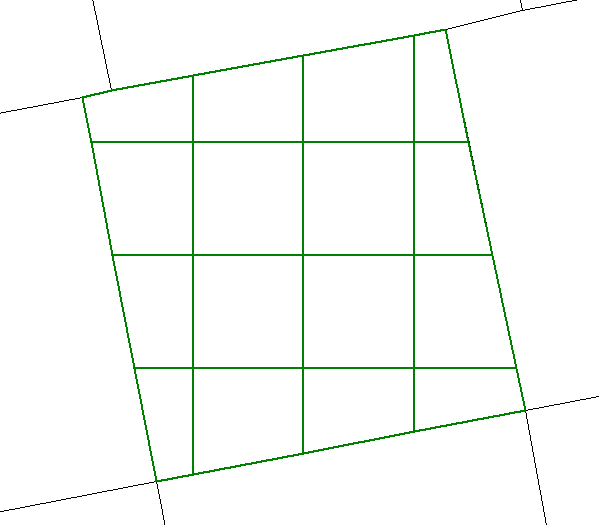
The following image illustrates the result of subdividing an area into a grid containing four rows and four columns, with the Create Horizontal/Vertical Subdivisions option checked. Note that the lines that define the subdivisions run horizontal and vertical, rather then following the direction of the sides of the area.
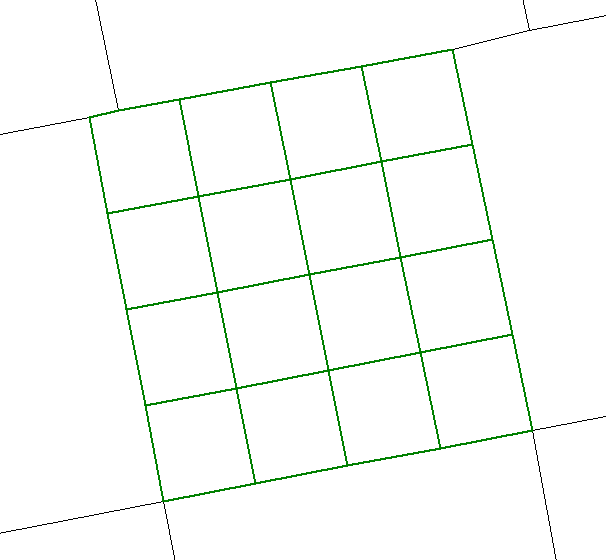
The following image illustrates the result of subdividing the same area without checking the Create Horizontal/ Vertical Subdivisions option. In this case, the lines that define the subdivisions run more or less in the same direction as the sides of the original area.
More Information
The Subdivide
Quadrilateral Areas command can operate on areas that are not,
strictly speaking, quadrilaterals (i.e., areas that have more than four
vertices.) When the input area has more then four vertices, and the Create Horizontal/ Vertical Subdivisions
option is not checked, Global Mapper will attempt to determine which vertices should
be used to represent the corners.
In most cases, Global Mapper will be able to correctly determine the corners, but, on occasion, the choices that Global Mapper makes may not be optimal. In this case, specify the vertices to be used as corners by selecting them before right-clicking on the selected area, as shown in the following figure. Note: specifying the corners will apply only when a single area is selected.
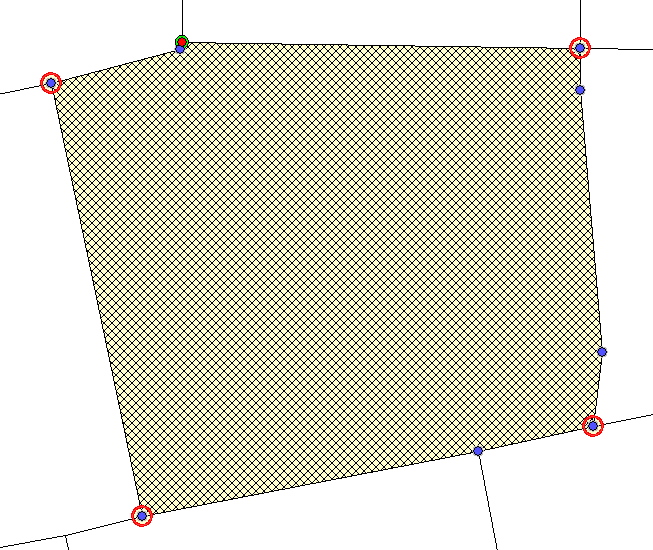
As you can see, the area to be subdivided is not strictly a quadrilateral, but by selecting the corners, a reasonable subdivision can be accomplished, as indicated below: