
The strike and dip tool creates point features that contain the correct parameters for geological strike and dip mapping, and automatically get a labeled and oriented geology point symbol based on the information entered.
Select the  Create Strike-and-Dip Point button from the Digitizer Toolset or the Digitizer menu.
Once the tool is selected, the cursor will show the  strike and dip icon. Select the location of the new point by left clicking at the desired location. Drag the cursor in the direction of the strike and then release it, and the point will be placed at the start of the mouse drag and the strike/ dip azimuth will automatically be initialized to that direction. To cancel creation of the point(s), press the Escape key or right click.
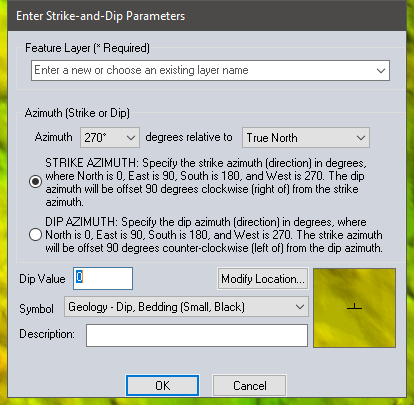
After selecting the location of the strike-and-dip point, the Enter Strike-and-Dip Parameters dialog (pictured below) appears. If necessary, set the Azimuth angle for the strike, then specify if it is relative to True North (the default), Magnetic North, or Top of Map/ Screen(grid North) and if it represents a strike azimuth or a dip azimuth. Then set the Dip value for the point (which will be used as the display label on the map), the symbol to use, an optional description, and which layer in the Control Center to place the new point feature.
There is also a Modify Location button which allows the user to fine-tune the location of the point by manually entering coordinates.
Once creating the strike-and-dip point is completed, the Digitizer Tool will remain in the strike-and-dip creation mode, simply left-click to create additional points centered on another location, or right-click to choose a different mode.
Hold down the Ctrl key when left-clicking to create additional points the new strike-and-dip point will automatically be created at the clicked location using the same parameters as the last strike-and-dip point that was created, allowing the user to quickly place a lot of points without going through the dialog each time.
Keyboard Shortcuts
- Left-click and drag - Place the strike point then rotate to set the azimuth
- CTRL - Place a new point with the same values as the last point (skip the dialog).
- ESC - Cancel the feature creation or exit the strike and dip tool.
Edit Selected Strike-and-Dip Point
To modify the values of an existing strike and dip point, select it with the digitizer tool. The Edit Selected Strike-and-Dip Point option is available from the context menu, or from the Digitizer menu under Advanced Operations
This will bring up the same Enter Strike and Dip Parameters dialog as shown above and the values can be modified.