
The Create Grid tool generates a regularly spaced grid of rectangular areas, boundary lines or points. This tool can be used for local surveys, sampling, repeated tiling tasks, and various other purposes.
The  Create Grid tool is available from the Digitizer Toolset, or from the Digitizer top-level or right-click context menu under Advanced Feature Creation.
After selecting the Create Grid tool the cursor will change to the  grid icon. Select the anchor point (top left corner) of the grid by left clicking at the desired location. Cancel creation of the point(s) at any time by pressing the Escape key or right clicking.
After selecting the anchor point for the grid, the Grid Setup dialog (pictured below) appears with options to specify the size, count, naming, and orientation of the grid cells.
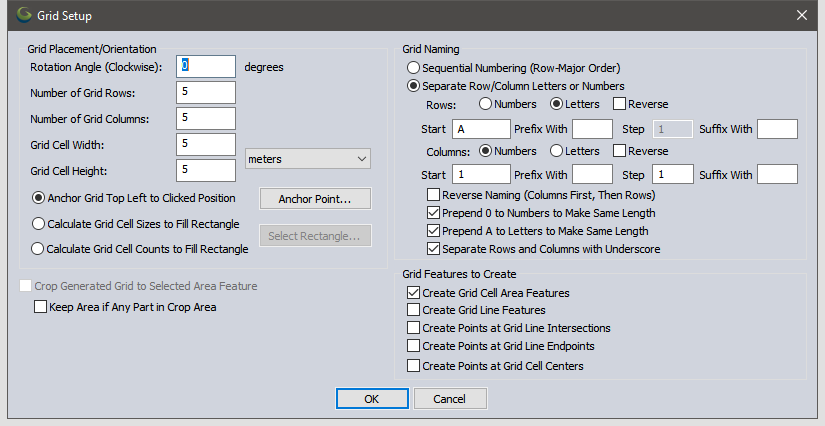
Grid Placement/ Orientation
This section provides a number of options to derive grid cell sizes and counts.
Select the Anchor Grid Top Left to Clicked Position option and specify the Rows, Columns, and Grid Cell width and height to derive a grid based on size.
Pressing the Anchor Point button to edit the location of the anchor point.
Calculate Grid Cell Sizes to Fill Rectangle - Select this options and then choose a rectangle area feature to calculate grid cell sizes or cell counts to fill the selected rectangle.
Grid Naming
Grid Naming - Select the naming convention to be used in naming the Grid cells. By default Rows and then Columns will be named, with Rows starting with 'A' and Columns with '1'.
Sequential Numbering (Row-Major Order)
With this option, a number starting at 1 for the top-left tile will be appended to the selected export filename. The number will increase across each row.
Separate Row/Column Letters or Numbers
With this option, separate indicators will be appended to the selected export filename for the row and column. If letters are selected, the letters A-Z will be used. If more than 27 letters are needed, multiple letters will be used (e.g. AA, AB, etc.). If numbers are used, the number values will be pre-pended with zeroes in order to make the numeric values have the same number of characters for every output tile. If the Reverse checkbox is marked, the order or the numbers or letters used will be reversed (e.g. if there are 4 rows and numeric naming is selected, the rows will be named 4, 3, 2, 1 instead of 1, 2, 3, 4). The user also has the option of specifying the letter/number to start naming at as well as the option to specify a prefix for each column and row number for each tile and the option to specify by what value numeric names should change by (step) for each successive row or column.
Options
If the Reverse Naming option is checked, the column name will come before the row name in the export filename, otherwise the row name will be before the column name.
If the Prepend 0 to Numbers to Make Same Length option is checked, the longest number will be found for both the column and row names and all other column/row names will have 0's prepended to make them all the same length. The same applies to column/row names using letters if the Prepend A to Letters to Make Same Length option is checked.
The Separate Rows and Columns with Underscore option causes an underscore to be used to separate row and column values in the output filenames. If not checked then no separator character will be used.
Grid Features to Create
Allows user to create grid line and area features. There are also options to create points at grid line intersections, endpoints and cell centers.