 Control Center
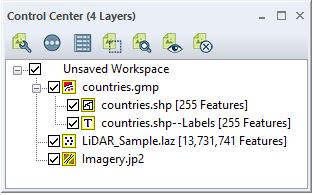
The Control Center (formerly the Overlay Control Center) serves as the central control for handling all loaded data sets (layers). Each data type is indicated by an icon next to the layer name. Layers can be selected and organized into groups that will then appear as an expandable list of layers in the control center.
Display the Control Center from the Tools menu, with the  Control Center toolbar button in the File toolbar, or with the Alt+C keyboard shortcut.
Layers containing vector features will show a feature count in brackets after the layer name. For layers containing grouped features, each group is counted as one.
Global Mapper will periodically check if the source files for a layer have been changed since they were imported. If so, the file name will be in bold.
Docking and Hiding the Control Center
By default the Control Center is docked on the left side of the application. Click and hold the top bar of the Control Center, then drag the mouse to undock the Control Center and relocate it. The Control center can also be docked or undocked by double-clicking the top bar.
Drag the Control Center towards the top, bottom, left or right of the map until a large rectangle appears to dock the Control Center in that location. Right click on the Control Center top bar to also see options to control the Control Center display:
- Floating — Display the Control Center in a floating window
- Docking — Dock the Control Center in most recent docked location
- Hide — Close the Control Center
Layer Order
To reorder layers in the Control Center, click a layer name and drag the layer up and down in the order. The right click Selected Layer Context Menu also contains the Layer Order sub menu.
This includes options to Move Selected Layers after another layer and Reverse Order of Selected Layers, as well as moving layers to the top and bottom of the list.
By default the layers display in the order they are drawn, so the top item is drawn first and subsequent items in the list are drawn on top of it. Turn on Display Layers in Reverse Order to have the top item in the Control Center draw on top in the map display.
To reverse the default order or the Control Center list, right- click onWorkspace and select Display Layer List in Reverse Order. When this setting is selected the top layer in the Control Center is displayed on top in the map view. Layers list below it in the Control Center will be displayed below it in the map view.
Layer drawing order is also impacted by the Vector Layer Ordering Configuration setting.
Selecting Layers
Multiple layers may be highlighted in the Control Center by pressing CTRL or SHIFT while selecting layers. The top bar of the Control Center will indicate the number of individual layers, and how many are currently selected in the Control Center.
All selected layers shown as highlighted in the Control Center will be acted on when pressing buttons on the Control Center (described below), when using options in the right-click Selected Layers context menu, and when using the Layer menu options.
Layer Types
The icon to the left of the layer name indicated the type of data contained in the layer.
Control Center Toolbar
 Layer Options
Double click on a layer or group to set options for the display of the layer(s). This is also available by right clicking on a layer. This bring up the Vector Options, Raster Options or Elevation Options dialogs.
Layer Options control the visual behavior and properties of the layer or group. This includes styling, interpretation of coordinate values and elevations, and visual effects such as image cropping, zoom level and display resampling. The available tabs depend on the types of data in the layer.
 Metadata
Highlight a layer in the control center and select the Metadata button to display the metadata for the layer. Alternately, press the M key and double click on a layer or right click on a layer and select the Metadata. For more information on metadata see Metadata
 Close Layers
Highlight a group or layer in the Control Center and press Delete to remove the selected overlays from the map. The Close option may also be accessed using the Close Layers button at the top of the control center, or choosing Close (Unload) Layers from the Selected Layers Context Menu. A warning will appear before closing the overlay(s).
*New features or grids that are created in Global Mapper and have not been saved or exported are not recoverable after closing unless an earlier version of the workspace was saved.
 Select All Features in Layer(s)
Highlight a layer or layers containing vector features in the Control Center, then press this button to select all vectors features in the layer with the Digitizer tool. If no layer is highlighted, all features in all layers will be selected. This option is also available from the Selected Layers Context Menu.
 Zoom to Selected Layer(s)
Highlight a layer or layers in the Control Center, then press this button to zoom to the full extent of the selected layers. This option is also available from the Selected Layers Context Menu.
 Show/ Hide Layers
The check box next to each layer indicated the visibility of the layer or group.
Press the check box to show the selected layer(s) and any sub-layers. If multiple layers are highlighted then all highlighted layers will be made visible.
Use the CTRL key while pressing a checkbox to invert the visibility of all selected layers. The invert visibility option is also available by pressing the spacebar on the keyboard.
Alternately, highlight a layer in the Control Center (or multiple layers), and use the Show/ Hide Layers button at the top of the control center to toggle or invert the visibility of the highlighted layers.
Rename Layers
Select a layer or group in the Control Center by clicking it, then click the name again once it is highlighted to edit the name of the layer or group. Alternately, right click on the layer and choose DESCRIPTION from the Selected Layers Context Menu to rename the layer. The Layer Description is used in a Legend.
Feature Count
Loaded vector data will display a count of features in the layer following the layer name. This is the total number of individual vector features, and not the count of multi-part features. For information about creating multi-part vector features see Multi-part Features.
Workspace Context Menu
Right click on the top level Workspace to reveal the following options:
Selected Layers Context Menu
Right-click on a layer or group to reveal a menu of options related to the layer. Many options that were available by right-clicking on a layer in earlier versions of Global Mapper have been moved to Current Workspace Context Menu, Layer Menu, or the Analysis Menu. The Layer Menu and Analysis Menu options that were moved from this menu are also available as a sub-menu at the bottom.