Spatial Database Import Options
The Spatial Database Import Options dialog is used to choose the table(s) to be loaded from the selected spatial database. Global Mapper displays this dialog when opening a database file directly, or after a spatial database connection has been chosen.
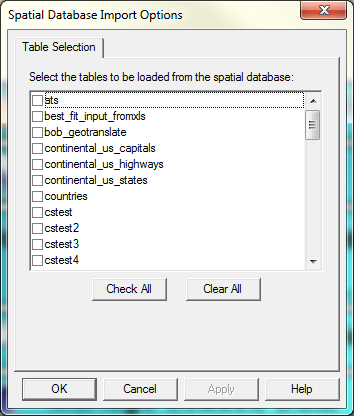
The table list contains the names of the tables in the spatial database. Put a check next to one or more table(s) to indicate which tables to load.
Click the Check All button to place select all of the tables in the list.
Click the Clear All button to remove the check mark from all of the tables in the list.
Click the OK button to load the selected tables.
The Cancel button quits the process of opening a spatial database.
The Help button displays the Global Mapper help for this dialog.
Raster
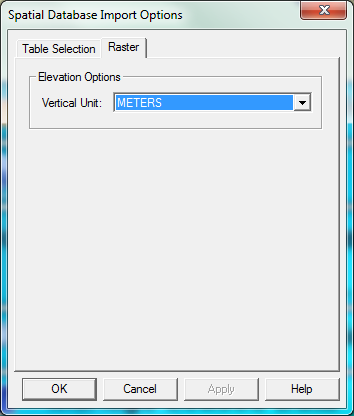
If the spatial database contains elevation data or raster imagery, the Spatial Database Import Options dialog will contain a tab to specify raster options.
Under Elevation Options, choose the Vertical Unit for the elevation data. The default is meters.
Import Bounds
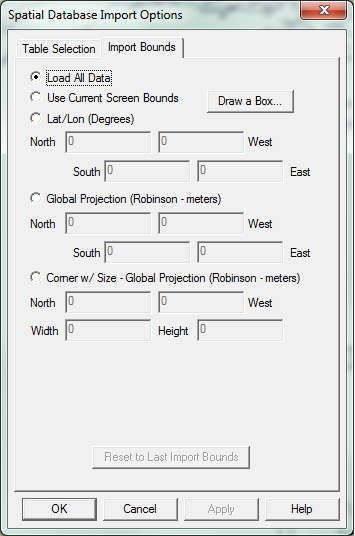
If the spatial database contains vector data, the Spatial Database Import Options dialog will contain the Import Bounds tab. This tab allows the user to select a subset of the input data based on a bounding box. All geometries that intersect the bounding box will be imported into Global Mapper. This functionality applies only to vector data in a spatial database.
Specify the bounding box in one of the following ways:
- Choose Load All Data to load all of
the data in the selected database tables into Global Mapper.
- Choose Use Current Screen Bounds to
use the current Global Mapper
screen bounds as the to define the input bounds. If there is no data
loaded into the viewer, then this option will not be available. If
there is data loaded in Global Mapper, but the full extent of the data is on the screen,
then this option will no be available.
- Click the Draw a Box... button to draw
the bounding box on the screen using your mouse. If there is no
data loaded into the viewer, then this option will not be available.
- Choose Lat/Lon (Degrees) to specify
the northwest and southeast corners of the bounding box in degrees
of latitude and longitude.
- Choose Global Projection to specify
the northwest and southeast corners of the bounding box in the unit
of the current global projection. If there is no data loaded into
the viewer, or the viewer currently has no projection defined, then
this option will not be available.
- Choose Corner w/Size - Global Projection
to specify the northwest corner, and the width and height of the bounding
box in the unit of the current global projection. If there is no data
loaded into the viewer, or the viewer currently has no projection
defined, then this option will not be available.
- Click the Reset to Last Import Bounds
button to retrieve the most recently defined bounding box in the unit
of the current global projection. If there is no data loaded into
the viewer, or the viewer currently has no projection defined, then
this option will not be available.