 Animate Layers
The Animate Layers tool performs an animation on a set of specified layers. When the animation is played, the layers are progressively shown . This allows for time-based modeling, such as displaying shadow movement from the Solar Shadow Calculations tool, as well as basic flip-book type animation or stop-motion animation.
The  Animate Layers tool can be found in the Viewer Toolbar.
Quick Steps for Creating a Layer Animation:
- Ensure the layers to be included in the animation are enabled in the Control Center.
- Open the Animate Layers tool.
- Choose which layers to include in the animation by checking them in the Layers list.
- To bulk select, hold the SHIFT key and select the top and bottom layer of a group.
- Use the

 buttons to speed up or slow down the time each layer persists and the overall length of the animation.
 - Press the
 Play button to start the animation. Each layer will play through. A message dialog in the upper left corner will indicate the current layer name.
 - Use the
 Pause button to stop the animation.
Tool Settings
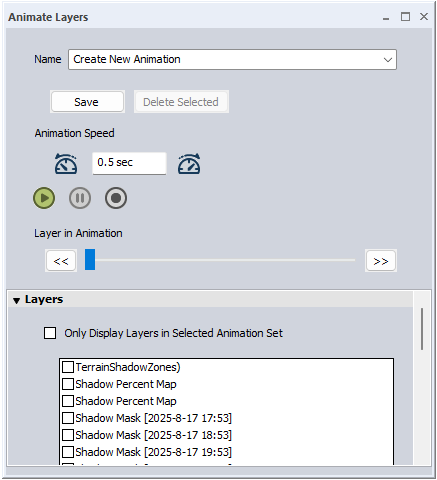
Name
Animation settings can be saved in the workspace for future use. This allows you to create and switch between multiple animation sets in the same workspace.
- To save new settings, choose Create New Animation from the dropdown, type in a name for the Animation, choose the desired settings from the Animate Layers dialog, and click Save.
- To use a previously saved animation, choose the previously saved animation from the dropdown and click the Play icon.
Animation Speed

Use the speedometer icons to adjust the animation speed by changing the length of time each layer is displayed. Decreasing display time increases the animation speed. It is also possible to specify the number of seconds that each layer will be displayed.
 Play
Play
Click this button to play through all layers added to an animation group at the specified animation speed, displaying the animation in the 2D map view. The animation will loop until paused.
Hidden layers that are unchecked in the Control Center will be skipped.
To display an Animation Legend during a play though, enable the option found in the Configuration menu, under Display Options > Animation Legend.
 Pause
Pause
Pause the animation.
 Record
Use this option to automatically create and export a recording of the animated layers. The recording will also include layers enabled in the Control Center and visible in the workspace.
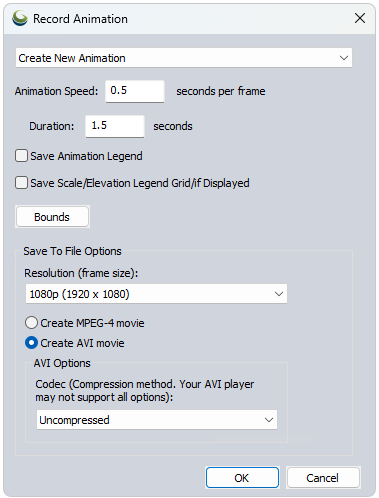
Save Animation Legend - Include a legend to display the name of the layer visible during the animation.
Save Scale/Elevation Legend/Grid if Displayed - The map scale, elevation legend, and grid will auto-populate in Global Mapper when relevant data is loaded, as enabled in Configuration. Check this box to also include them in the animation recording.
Bounds - Limit the Animation bounds.
Click OK to save the recording.
Display Only Top/Current Animated Layer in Workspace
Check this option to use the Layer in Animation slider. When checked, all layers other than the currently active layer in the animate tool will be turned off in the workspace, allowing users to view one layer at a time to model the animation. This box does not affect the animation. Uncheck this box before closing the Animate tool to return to normal layer visualization.
Layer in Animation
With the above check box enabled, use the Layer in Animation slider to manually move through the selected animation, displaying the layers one at a time in the main 2D view. Click and drag on the slider to scroll through, or use the << >> buttons on either end to move layer by layer. The dynamic progress marker shows the current layer number being displayed / total number of layers in the animation.
When an animation is playing, the Layer in Animation slider will move to track animation progress.
Layers
Only Display Layers in Selected Animation Set - Check this box to hide layers that are not checked in the Animate Layers list.
Check layers to be included in the animation.
Once checked in the layer list, the corresponding layer will be colored in blue in the Control Center. When a layer is displayed during an animation, it will be blue and bold.