Vertical Options
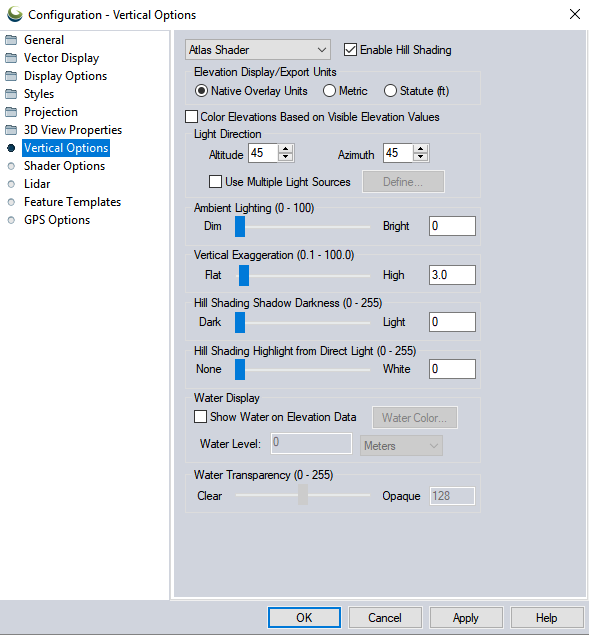
The Vertical Options section of the Configuration dialog controls options for the display of elevation data.
Access the Vertical Options by selecting the  Configuration button from the File Toolbar or Tools menu, and navigating to the Vertical Options section.
 Shader Drop-down
The Shader selection box allows for the selection of the algorithm used to color and shade any loaded elevation data.
The shader drop-down is found on the Viewer Toolbar. It can also be accessed from the Configuration Vertical Options section, or the Dynamic Hill Shading tool.
The following default shaders are available:
- The Atlas Shader is the default shader. It generally provides good results for any loaded elevation data. Like most of the options below the color ramp will scale to the data range.
- The Color Ramp Shader displays ramps color from blue for low elevations to red for the highest elevations by default.
- The Daylight Shader colors all elevations the same and is only useful when hill shading is turned on.
- The Global Shader is designed for shading elevation data sets covering large areas of the earth such as Terrain Base and GTOPO30. The results are quite stunning for data sets such as these. This shader uses fixed elevation values, so elevations values will be colored the same from workspace to workspace.
- The Gradient Shader moderates the color with elevation between the low elevation and the high elevation. The actual colors ramped between can be selected on the Shader Option panel.
- The HSV Shader maps the elevations onto the HSV (hue saturation value) color space. The mapping can be configured on the Shader Options panel.
- The Inferno Shader is useful for visualizing data in the style of a heat map. Similar to the Viridis Shader, it is useful for printing in black and white, or for users with colorblindness.
- The Magma Shader covers a wide perceptual range in brightness and purple-yellow. Similar to the Viridis Shader, it is useful for printing in black and white, or for users with colorblindness.
- The Plasma Shader is another color option similar to the Viridis Shader. This color palette is useful for printing in black and white, or for users with colorblindness.
- The REM Shader is designed to highlight trends at the lowest elevation of the data. Enabled by default when generating REM layers.
- The Slope Shader colors loaded terrain data by the slope of the terrain rather than the absolute elevation. This shader allows you to identify the portions of the terrain that are
relatively flat vs those that are relatively steep. The definitions of "flat" and "steep" are user configurable on the Shader Options panel. - The Slope Direction Shader colors loaded terrain data by direction in which the terrain faces rather than the absolute elevation. This shader allows you to easily identify things like the portions of the terrain that face south, or any other direction. The colors to use for each direction are user configurable on the Shader Options panel.
- The Viridis Shader covers a wide perceptual range in blue-yellow, and does not rely as much on red-green contrast. This color palette is useful for printing in black and white, or for users with colorblindness.
- The NDVI Shader (Normalized Difference Vegetation Index) is used for multi-band imagery that has had the NDVI Calculation applied to it.
- The NDWI Shader (Normalized Difference Water Index) is used for multi-band imagery that has had the NDWI Calculation applied to it.
- The Curvature Shader colors the grid values on a white to black gradient over values around zero with positive values being white and negative values being black. This is a fixed range shader for values [-2, +2] and will be automatically applied to generated curvature grid layers.
- The Sun/Shadow Shader is designed to color the output grids created using the Solar Shadow Calculations tool representing shadow count or shadow percentage.
- The Solar Shader offers a range of colors designed to be applied to the output grids created using the Solar Shadow Calculations tool representing shadow count or shadow percentage.
- If any custom shaders have been created, they will be available as well.
Custom shaders can be created and edited in Shader Options.
 Enable Hill Shading
Use this option to view elevation data as shaded relief. With this option off, the map appears flat, with elevations distinguished by color only. With it on, shadows are generated using the loaded elevation data along with the remaining settings on this panel.
Hill Shading can be enabled from the check box at the top of Configuration Vertical Options tab, or from the button on the Viewer toolbar. It is automatically enabled when using Dynamic Hill Shading.
Elevation Display/ Export Units
This option allows you to modify the units that elevations will be displayed in on the status bar as you move the cursor over loaded elevation data.
Native Overlay Units
The status bar display and exports will use the vertical units the layer has assigned in the Elevation Units Interpretation.
Metric
The status bar and export will use metric units.
Statute (ft)
The status bar and export will us statute units.
Color Elevation Values Based on Visible Elevation Values
Check this option to color elevation values based on the min and max in the display extent, rather than the min and max of all loaded data. This option only modifies shaders that use the option to Scale Shader to Loaded Elevation Values.
Light Direction
These options set the position of the light source (the "sun") for performing Hill Shading. Note that cartographic azimuth and altitude are used.
Azimuth
The direction of the sun, measure in angular degrees from North. An azimuth of 0 means the sun is to the north, 90 azimuth means the sun is to the east, etc.
Altitude
The angle of the sun above the horizon. An altitude of 90 means that the sun is directly overhead, while an altitude of 0 means the sun is on the horizon.
Use Multiple Light Sources
Select this option to add multiple light sources to the terrain. Press the Define... button to setup the light sources using the following settings:
Number of Sources: This is the number of light sources to use with the shader. When a number greater than one is specified, additional light sources will be distributed evenly in a circle, starting from the Azimuth specified above.
For example, if the Azimuth is 45°, and the user specifies 4 light sources, the sources will be positioned at 45°, 135°, 225°, and 315° degrees.
Blending Algorithm: The intensity values calculated for the multiple light sources can be handled in the following ways:
- Maximum - the maximum intensity for each pixel will be used.
- Minimum - the minimum calculated intensity will be used.
- Average - the intensity values from the light sources will be averaged.
- Weighted Average - the intensity values will be averaged, with extra weight given to the value calculated at the specified Azimuth.
Ambient Lighting
Use the Ambient Lighting to brighten up dark looking data sets or dim bright looking data sets.
Vertical Exaggeration (for hill shading)
The Vertical Exaggeration setting is used to control the exaggeration of relief features for hill shading in terrain datasets and other texture mapped images. Increasing the terrain vertical exaggeration increases the effect of shadowing and highlighting from the light source. This setting is independent of the 3D vertical exaggeration and path profile settings.
Hill Shading Shadow Darkness
The Hill Shading Shadow Darkness setting is used to control how dark the darkest shadows are in hill shading. By default, the value of 0 allows shaded areas to go all the way to black. By moving this slider to the right shadowing will be capped in high relief areas, thus allowing the use of other controls to better bring out detail in low-relief areas.
Hill Shading Highlight from Direct Light
The Hill Shading Highlight from Direct Light setting is used to display a whitened highlight area in terrain areas that are getting direct sunlight based on the lighting angle selected. The slider controls the amount of whitening highlight applied to those direct sunlight areas.
 Water Display
To enable the display of water on elevation data sets, check the Show Water On Elevation Data option. This setting is separate from the 3D water display, and only shows as a pixel tint in elevation datasets and texture mapped images.
This option is available as a button on the Viewer toolbar. It is also available in the Configuration Vertical Options.
The Water Transparency controls the clarity of displayed water if configured to display water. Clearer water shows more underlying relief to show through, while opaque water allows none.
The Water Level setting controls the level at which water is displayed. The default is set at an elevation of 0 meters above sea level. Use this to simulate different flood and sea level change scenarios.
The Water Color options allows you to set the color of the water. The default is blue.