|
|
This tool requires Global Mapper Pro |
The Load Selected Images as Orthoimages tool can use the camera parameters embedded in an image file, along with a surface model (DSM), to automatically orthorectify images. Orthorectification![]() The process of creating a rectified planimetrically correct image, removing the effects of image perspective, terrain, and oblique angles of above ground objects such as buildings.is the process of creating a rectified, planimetrically correct image, removing the effects of image perspective, terrain, and oblique angles of above ground objects such as buildings.
The process of creating a rectified planimetrically correct image, removing the effects of image perspective, terrain, and oblique angles of above ground objects such as buildings.is the process of creating a rectified, planimetrically correct image, removing the effects of image perspective, terrain, and oblique angles of above ground objects such as buildings.
Access the Load Selected Images as Orthoimages tool from:
- The Pixels to Points Map menu
- Or, select the loaded picture points with the digitizer tool and right-click to Load Selected as OrthoImages.
You can also generate individual orthoimages when running the Pixels to Points tool by checking the Orthorectify Each Image Individually option.

Note: It is recommended to run the orthorectification process using a point cloud or DSM generated from the Pixels to Points tool, which creates a detailed surface model from the point cloud. If run in the same session, it also adjusts the camera position to fit the reconstructed scene and removes lens distortion from the images, which leads to better orthorectified images.
Quick Steps to Generate Rectified Images
Sometimes it is helpful to quickly auto-rectify images to approximate their ground coverage. When no precise terrain model is specified, the resulting images are not precisely orthorectified and each pixel will not likely align to its correct location. Follow these steps to quickly auto-rectify aerial images
- Load the images into Global Mapper and if prompted, choose the option to load as picture points. Or load the images into the Pixels to Points dialog.
- Select the images with the Digitizer tool, and right-click to Load Selected as Orthoimages.... . Or choose Load Selected Images as Orthoimages from the Pixels to Points Map menu.
- Choose the option to Create an Orthoimage Layer for Each Selected Image
- If available specify a digital surface model (DSM) or point cloud layer in the Select Surface (DSM) Layer(s). While not required for 'quick rectification', this can help correct the scale of the image and remove some of the relief. However, note that camera positions typically store elevation in ellipsoidal height, and the height model of the surface layer should match that of the camera metadata. See Select Surface (DSM) Layer(s) for more information.
- The selected picture points will be automatically placed on the 2D map, each as its own ortho layer listed in the Control Center.
Generate High-quality Orthorectified images
The highest quality orthoimages can be obtained by first running the Pixels to Points tool to generate a detailed point cloud of the scene. Once the Pixels to Points tool has been run, the orthorectification tools will use the corrected camera positions. This adjusts the camera roll, pitch and yaw based on the alignment determined during reconstruction. It also adjusts the camera height based on the reconstructed scene and any referenced height information such as Ground Control Points or a Ground Height value. The lens distortion is also removed from the images based on the specified Camera Type.
- Load Images into the Pixels to Points tool
- Run the Pixels to Points process (for highest quality images, do not use the Reduce Image Size option).
You can generate individual orthos during Pixels to Points process by checking Orthorectify Each Image Individually
or - Highlight the images you would like to orthorectify in the Pixels to Points Tool Input Image Files list using the CTRL or SHIFT keys to multi-select.
- From the Map menu, choose Load Selected Images as Orthoimage...
- In the Select Surface (DSM) Layer(s) option, choose the Generated Point Cloud produced by the Pixels to Points process, or a gridded surface model that has been generated from this point cloud.
Note: The individual images that are orthorectified are subject to the fit error reported in Pixels to Points, and as a result the individual images may not align perfectly at the edges compared to the Orthoimage generated from the mesh.
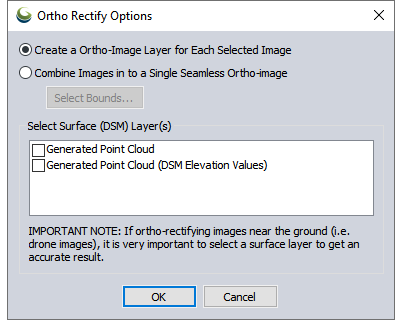
Create an OrthoImage Layer for Each Selected Image
This option will produce a new image layer for each selected picture point. This option is recommended for most pictures that do not have high precision positioning.
For tools to manually mosaic these images together, see Raster Options including feathering, cropping, color/contrast adjustment, display, position adjustment including rectification and shift selected layers. See also Reorder Maps by Location.
Combine Images in to a Single Seamless Orthoimage
Select this option to automatically stitch the images together into a single image. Due to the imprecision of camera metadata and/or 3D reconstruction results, this option is not recommended for most cases, especially when the scene contains buildings and other above ground objects and the photos are not nadir.
Note: The individual images that are orthorectified are subject to the fit error reported in Pixels to points, and as a result the individual images may not align perfectly at the edges compared to the Orthoimage generated from the mesh.
Select Surface (DSM) Layer(s)
Specify the point cloud or terrain layer to use during the orthorectification process. This will remove the effects of relief in the terrain. It is also necessary to correct parts of the image that are oblique in data that is close to the ground (such as drone collected imagery). For this reason it is recommended to use a detailed digital surface model (DSM), which includes the buildings and trees.
Camera metadata typically stores elevation data in ellipsoidal height. If this tool is run after using Pixels to Points, the height may be modified to align to the heights of Ground Control Points or a single Ground Height value used in the options. When orthorectifying individual images, the height model (vertical datum) of the terrain layer should match that of the Z values referenced for the images.