Raster Reclassification
The Raster Reclassify tool modifies the pixel values of a raster layer, including palette images, terrain data, and single bands of imagery. Using a set of reclassification rules specified in a table on the right side of the dialog, input pixel values are converted to output pixel values specified in the Output Index.
Access the Raster Reclassify tool from the Analysis menu, by selecting Raster Reclassification...

- To reclassify an image select the Input Layer from the loaded visible raster layers. The left side of the dialog will change depending on the type of input data, as seen above.
- If the referenced layer is a palette image, optionally press the Load Palette from Layer to see the existing pixel values in the left table, or load a palette from another file as reference.
- Specify the Reclassified Layer Name in the top right of the dialog.
- To set up the conversion table on the right side, drag items from the left table to the right side and specify the new Output Index value. Or right-click on the right table to add a New Item and manually specify the input Palette Indices and Output Index.
- Alternately, load an existing common palette using the drop down menu, and pressing the load button. Description is optional.
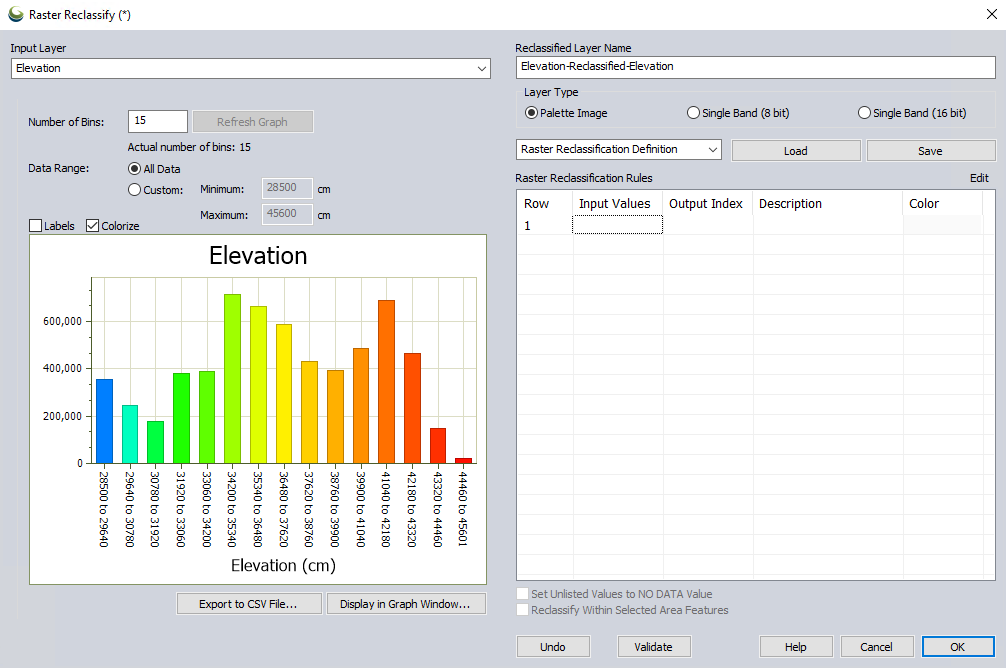
Input Layer – Specify the layer to perform the reclassification on. The left side of the dialog will change depending on the type of input layer. Palette data will show the Reference Palette table. Continuous data including elevation and imagery will show a histogram of the input file.
If the input layer is terrain, the value referenced will be based on the selectedShader. If the elevation shader is set to a slope shader or a slope direction shader, than the reclassification result will be based on that value displayed on the 2D map.
Reclassified Layer Name – Specify the name of the resulting layer. By default, this will be the input layer with -Reclassified appended.
Layer Type- The output raster layer can be stored as a palette image, or a single band raster layer. Choose between the palette, 8-bit single band and 16-bit single band options. A palette image has colors associated with index values, and also optionally can contain class descriptions. Single band images are simple rasters with just integer values. They can be used with any terrain analysis tools (contouring, slope calculation, etc.).
Set Unlisted Values to No Data Value - Check this option to ignore any values in the input layer that are not listed in the output reclassification rules. Unlisted values will be set as 'No Data' pixels when this option is checked. If unchecked, the input values that are not listed in an output rule will stay as the same values.
Reclassify Within Selected Area Features - Check this option to crop the generated reclassified layer to the selected area feature(s) in the workspace. Select the area features before opening the reclassification tool. This option is disabled if no area features are selected.
Reference Palette
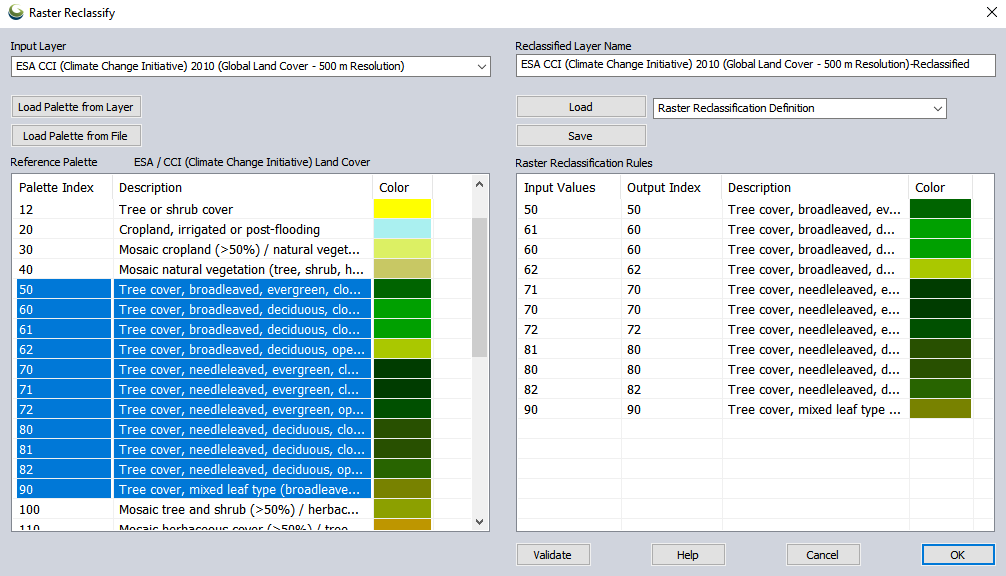
The reference palette table on the left side of the dialog shows information about the input layer if the input is a palette image. This table is optional and does not need to be used, but can provide a helpful reference for specifying the input and output values in the Raster Reclassification Rules specified on the right table. Use the Load Palette from Layer button to populate the left table with the values present in the input image.
When the left table is populated, one or more rows from the input palette can then be selected and dragged to the populate the Reclass Rules table on the right side. Two options are available for copying values from the left reference palette into the right Raster Reclassification Rules table:
Combine many values into a single output - drag left to right: Use the Shift or CTRL keys to highlight multiple rows in the reference palette. Drag the highlighted rows to the right reclassification table to combine them into a single Output Index value. The default color will be an average of the combined inputs when copying to a blank row.
Example: The first option is to copy a range of rows from the Input Layer to a single output row in the Reclass Rules. This option is useful to reclassify multiple pixels to a single value. For example, one might want to reclassify all Tree Cover pixels (values 50, 60, 61, 62, 70, 71, 72, 80, 81, 82) to a single pixel value of Trees with a value of 50. Select all the input rows from the reference palette and drag them onto the Reclass Rules. Enter an optional Description in the newly created row. Note that the color of the new row is an average of the colors from the reference palette. If this is not acceptable, you can change the color by clicking on it and choose from the Color Picker dialog.

Keep unique values- CTRL and drag left to right: Use the Shift or CTRL keys to highlight multiple rows in the reference palette. Drag the highlighted rows to right reclassification table while holding down the CTRL key to move each input layer into the output. By default this rows will maintain the same input Palette Index and Output Index, as well as description and Color.
Example: The second option is to copy the selected rows from the reference palette into separate rows in the raster reclass rules. To perform a copy, hold the Ctrl key while dragging to rows. See example below.
Load Palette From Layer– Reads the palette information from the layer and populates the left hand palette list
Load Palette From File – Reads the palette information from a palette file and populates the left hand palette list
Histogram
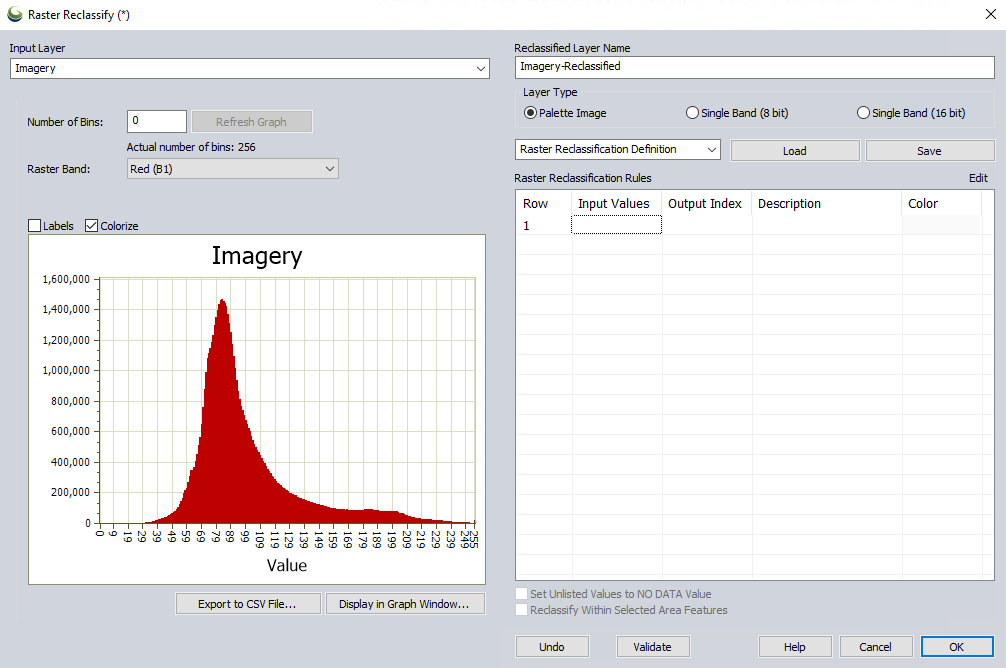
If the input layer is a continuous raster, such as imagery or terrain data, the left side of the dialog will display a histogram of the layer for reference. Use the Number of Bins value to change the number of histogram bars, then press Refresh Graph to update.
With multi-band imagery data, there is a dropdown to select the raster band. Raster Reclassification can only be performed on one band of data at a time. Choose the band which will be reclassified into a single band layer.
For more info on the histogram options, see Histogram.
Raster Reclassification Rules
The table on the right side of the dialog will be populated with the raster reclassification rules. This table specifies the new output pixel value for each input pixel value or set of input pixel values. This table can be populated by dragging rows from the left table, by right clicking and manually entering new rows, or by using the load button to populate the Raster Reclassification Rules with an existing palette or previously saved Raster Reclassification Definition.
-
Palette Indices – Specify the input pixel values that will be converted to the output. This can be listed as a single value, comma separated values, or a range of values using a - . It is also acceptable to add a row containing the keywords else, other or default (case insensitive) to capture all input pixel values not specified in another row.
-
Output Index – Specify the output Palette Index to be applied when reclassifying the input Palette Indices.
-
Description - Optionally specially a palette description.
-
Color - Specify a color for the palette value in the output image. Click the color to bring up the Color picker dialog, which also includes a choice to Pick Color from Map.

The reclass rules can be edited manually to create reclassification rules. Double click on a Reclass Rule cell to edit it. Use the Return key to complete editing, or the tab and arrow keys to move to different cells.
In addition, right-clicking the mouse in the Reclass Rules grid will bring up a menu option to add or delete a row. The Insert Row option in the context menu will add a new blank row to the reclass rules grid. Delete Rows will delete all highlighted rows.
Create Spread
It is also possible to automatically create rows in the reclassification rules at a repeating interval. The input values will repeat a range at the next interval, while the output values increment up by a specified step size.
-
Create two rows. The first row contains a range. This determines the ranges of the generated rows. Set the output of the first row to the start value, and the second row to the end value.
-
Optionally select a color for each row (descriptions are ignored)
-
Select both rows by holding down the SHIFT key, right click and choose 'create spread'

-
Enter an step value to increment the output value.

-
A number of rows will be created with input ranges and output values. If colors were specified they will be spread over the range.

Reclass Rule Conditions
With reclassification rules it is possible to reference a range or values, set a value for all remaining inputs, and also set some outputs to a null 'no data' value. When editing the reclass rules, the following conditions must be followed.
|
Condition |
Example |
|---|---|
|
A Palette Indices row may contain valid palette index values separated by a comma. |
1,5,7,10 |
|
A Palette Indicies row may contain negative values using a dash to indicate negative values. |
-8,-1,5 |
|
A Palette Indices row may specify a range contain valid palette index values separated by a dash. |
70 - 72 |
|
A Palette Indices row may specify a range containing negative values using a dash to indicate negative values and a dash to separate the values. |
-6000 - 0 |
|
A Palette Indices row must not contain both individual values and ranges |
1,5,7,10,70 - 72 (Invalid) |
|
Reclass Rules may contain a single keyword for the default case indicating that if no other rule applies then use the Output Index value for a pixel conversion. |
Acceptable keywords:
|
|
A Palette Index may only appear in one row. |
|
|
An Output Index must contain a single valid Palette index or one of the keywords for No Data. The No Data value will be assigned the current transparent color for the layer. |
|
Saving, Loading and Validating
Load – This loads in the palette or saved Raster Reclassification Definition file specified in the drop-down to the right and populates the Raster Reclassification Rules table below.
Save – Saves the Raster Reclassification Rules specified in the table to a Raster Reclassification Definition file that can be reused for future reclassifications. This is a *.gmr file that is a comma separated list of the values specified in the table that list the input Palette Indices, Output Index, Description and RGB Color value.
Validate – Checks the Raster Reclassification Rules and combines values into ranges where appropriate. To ensure the rules are correct, press the Validate button. This will check that all the conditions in the above table are met, and group individual Palette Indices together for equal Output Index values. Validating will not only check the data, but also sort it by Output Index.
Note: The Output index shown in the Reclass Rules is the index of the first color in the reference palette containing the row's color. For example, if two reference palette rows (e.g. 60 and 61) have the same color value, then the Output Index in the reclass rules for both of them will be the value of 60 because it appears first in the reference palette.