Labels Tab
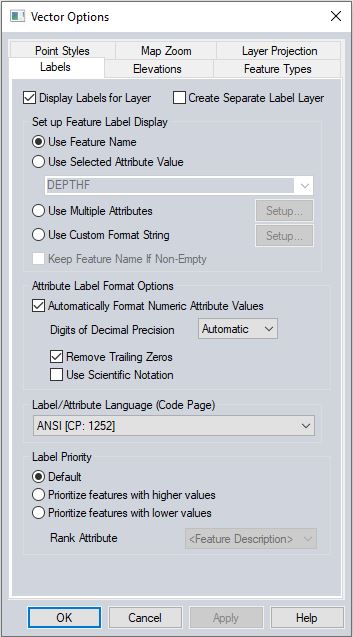
The Labels tab specifies the label setup for a vector layer.
Access the Labels tab from the Control Center, by double clicking on the layer or using the  Layer Options button.
Create Separate Label Layer
If enabled, this option will create a separate Label Layer that will contain all of the labels. Creating a separate label layer allows for much greater control over the location and style of the labels, and makes it so that they can be selected and manipulated with the Digitizer tool. Any settings in the original Labels tab will be used to define the label layer, but once it is created, the Labels tab will disappear, and those settings will instead be available in the Vector Options window for the new, separate label layer.
Set Up Feature Label Display
Use Feature Name
This option specifies that the original or edited display label associated with a feature should be used for display. When creating a new feature, or editing an individual feature, this is the value entered in the top of Modify Feature Info for the Name.
Use Selected Attribute Value
Specifies that the value of the selected attribute will be used as the display label for the feature.
Use Multiple Attributes
Allows the user to choose one or more attributes to combine to create the display label, as well as provide custom prefix, suffix, and separator strings.
Use Custom Formatting String
This allows the user to provide
a custom formatted string that can contain any free-form text and
attribute values embedded as %ATTR_NAME%. The name of any feature
attribute can be used as ATTR_NAME or special attributes, like <Feature
Name>, <Feature Desc>, <Feature Layer Name>, etc.
Example:To create a display label from the original feature label, the layer name, and an attribute named FCODE, you could use the following: %<Feature Name>% - Layer Name: %<Feature Layer Name>% - Feature Code: %FCODE%.
Keep Feature Name if Non-Empty
When this option is enabled the <Feature Name> attribute will be used instead of the selected attribute option only for values that have data present in the <Feature Name> attribute. This allows you to change a few of the labels without having to create a new attribute just for labeling purposes.
Label Style Options
Label Style by Feature - Choose this option to be able to edit the style of label features individually, by selecting them with the Select Labels tool, right-clicking, and choosing "Edit Label Feature Style."
Same Label Style for All Features - This option will enable the "Select..." button to set the style for all label features at once. If you attempt to edit the style of an individual label feature in the map view by right-clicking on it and choosing "Edit Label Feature Style," these changes will not appear unless you switch the label style option back to Label Style by Feature.
Attribute Label Format Options
Automatically Format Numeric Attribute Values - Check this option to format labels that contain all digit values as numbers with a specific display set in the options below.
Digits of decimal precision - Sets the number of digits to the right of the decimal place. "Automatic" uses default processing based on the data.
Remove Trailing Zeros - Removes trailing zeros to the right of the decimal place.
Use scientific notation - Formats the number using scientific notation.
Label/Attribute Language (Code Page)
Use this setting to convert label and attribute values from the layer's native code page or display in the user interface, and when setting new values for the label and code page.
Label Priority
This section allows the user to define the priority of labels at zoom extents where all the labels cannot be shown at once.
Default - This option uses automatic processing based on the data.
Prioritize features with higher values and Prioritize features with lower values - These options will prioritize labels based off of the values in the selected Rank Attribute, in either descending or ascending order.
For instance, for county population data, choosing Prioritize features with higher values for the Rank Attribute of POPULATION will make it so that the labels that represent the features with the highest populations are always shown first, if not all can be shown.