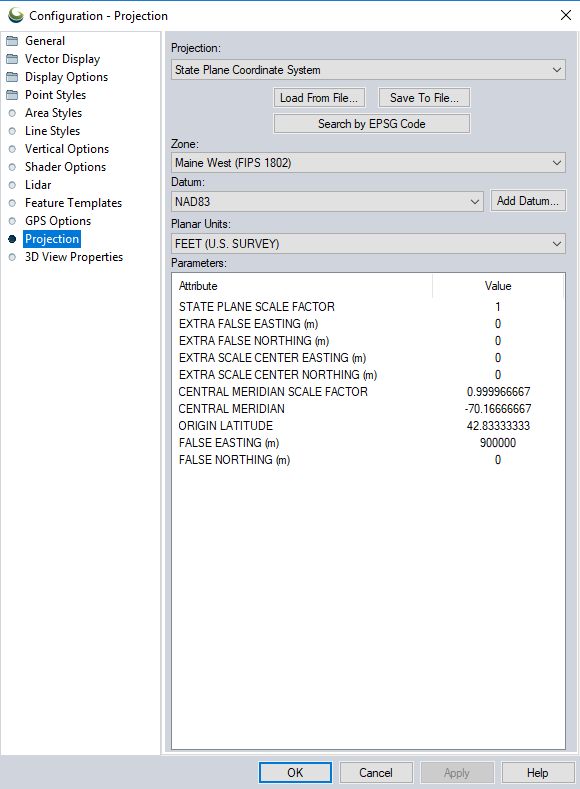
The Projection panel of the Configure dialog (pictured below) is used to modify the projection and datum that the currently loaded data is displayed in. This section may also be accessed by double clicking on Current Workspace at the top of the Control Center.
Use the Projection pull-down menu to select the projection you wish to view the currently loaded data in. The Geographic projection is really the absence of a projection. It is just a linear mapping of latitude/longitude to a grid.
For a complete list of projections see Projection Definitions .
The projection specified in the configuration dialog is the display projection. All other data will be transformed into this projection for drawing/ displaying. The projection for the workspace is set by the first data that is loaded into the workspace. Otherwise, the default projection when starting with digitizing is Geographic Latitude/Longitude WGS84.
For a good description of most of the other supported projection systems and a discussion of the tradeoffs in using various projections, we suggest visiting http://www.progonos.com/furuti/MapProj/Normal/TOC/cartTOC.html.
You can save the currently selected projection to a PRJ file using the Save to File button. Previously saved PRJ, WKT TXT and ESRI XML files can be loaded using the Load from File button. Load projections from GeoCalcOnline by logging in and saving the WKT to a TXT file, then load in Global Mapper.
By default, the PRJ file will be saved in the newer WKT (well-known-text) format used by most products. For more information on the formats and custom projections, see Loading Projections
To find the EPSG code for a projection, check GeoCalcOnline or the EPSG registry.The Search by EPSG Code button allows you to initialize a projection definition based on a numeric EPSG projected coordinate system definition. There are numerous built-in EPSG code definitions, but by no means is there an exhaustive set.
Add custom EPSG code definitions (or modify built-in ones) by modifying the epsg_codes.txt file installed in your Global Mapper installation folder. This file also stores custom projection names, which will not display in the interface, but will be used for exported prj files.
The format is described in the file header. You must re-start Global Mapper after changing this file for the changes to have any effect.
The Zone selection allows you to select the zone for use with the UTM, State Plane, Gauss Krueger, and other zoned projections.
The Datum pull-down is used to select the datum to use in association with the projection. The most commonly used datums are WGS84, NAD27, and NAD83.
For a complete list of Datums see .
If the datum is not available, use the Add Datum button to add a custom datum. When that button is pressed, the Create New Datum dialog (pictured below) is shown. Specify the datum name and abbreviated name for the custom datum. The abbreviation field is what will be displayed for the datum name in the status bar. If your datum uses a prime meridian other than Greenwich, enter the longitude of the meridian used (relative to Greenwich) in the Prime Meridian entry box.
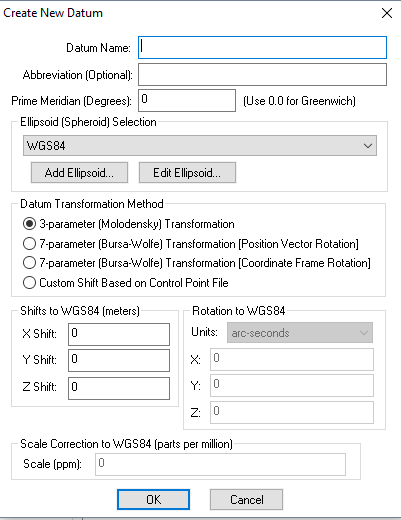
Datum Transformation Method
Select and specify the parameters for either a 3-parameter Molodensky datum transformation or a 7-parameter Bursa-Wolfe datum transformation, or specify a transformation defined by a text file with a list of control points, use the Custom Shift Based on Control Point File setting.
7-parameter Bursa-Wolfe
Specify either a Position Vector Rotation or a Coordinate Frame Rotation method.
Custom Shift Based on Control Point File
With the Custom Shift Based on Control Point File option, the text file that is selected should have a series of lines defining the mapping from a lat/lon coordinate in the new datum and the corresponding lat/lon value in WGS84. This is a very easy way to define a datum if you don't know any transformation parameters, but do know the WGS84 coordinates for at least 2 coordinates in the new datum. The format of each line would be as follows:
Degree Longitude in new Datum, Degrees Latitude in new Datum, Degree Longitude in WGS84, Degrees Latitude in WGS84
Example:
-70.8255835618, 45.4002372880, -70.82558356, 45.40023729
-70.8138608478, 45.3573208993, -70.81386085, 45.35732090
-70.9531879330, 45.3391776290, -70.95318793, 45.33917763
-70.8144989978, 45.3080936147, -70.81449900, 45.30809361
The datum information will be stored in the custom_datums.txt file in the Global Mapper Application Data folder (see Configuration > General > Advanced for the location of this folder). To share custom datums copy that file to that folder on another user's computer.
If a needed ellipsoid is not built in to Global Mapper, use the Add Ellipsoid button to add a new one or Edit Ellipsoid to edit an existing custom ellipsoid definition.
With the Planar Units pull-down select the ground units to use with the projection. For more information see Projections: Planar Units
For those projections that require additional parameters to fully define them, the Attributes table allows you to enter the values for each applicable parameter. Parameters shown in grey are not editable, because they are part of the named projection definition.
To modify the parameters of a named projection, chose the matching generic projection method, and all matching attributes will be copied. For example, to create a custom projection starting from a UTM zone definition, select the UTM zone, then switch the projection name from UTM to Transverse Mercator. The