 Connect to
Online Data
Connect to
Online Data
Connect to Online Data allows the user to download map data from numerous built-in and user-supplied sources. This includes access to worldwide street maps from OpenStreetMap.org, seamless USGS topographic maps and satellite imagery for the entire United States. In addition, access is provided to several built-in WMS (OpenGC Web Map Server) databases to provide easy access to digital terrain data (NED and SRTM) as well as color satellite imagery for the entire world.
Data is streamed directly into the Global Mapper workspace, and can be exported and opened in Global Mapper for use in analysis. For sources that stream multiple zoom levels, it's recommend to export as a Global Mapper Package (.gmp) file to take advantage of the Online Layer Export Options.
Custom data sources can be added by individual users for custom access to any data published via WMS, WCS, WFS, WMTS, TMS, OSM or Google Tile formats, or ESRI RESTful Feature Service or tile cache.
Connect to Online Data using the  Connect to Online Data button in the File Toolbar, or selecting Download Online Imagery/Topo/Terrain Maps... from the File Menu.
Note: This feature requires Internet access to work.
Note: Global Mapper provides convenient access to online sources hosted by third parties. Blue Marble Geographics does not have control over service availability and does not guarantee data access. Please see the individual source website for data usage policies.
Quick Steps for Accessing Online Data:
1. Select an Online Data Source from the list of built in sources. For more information on a source, right click and choose Display Source Web Page/ Terms of Service. With a source selected, click Next.
Most online sources will download directly into the map. Some sources, such as satellite image archives, require additional selection within a web browser. Global Mapper will auto-populate the requested data bounds in the browser when possible.
2. Specify the area to download:
- If data is already loaded, the Area to Download will default to the current screen bounds but can be changed to any other option.
- If no data is loaded, it is recommended you limit the area of data to download with the within an address or within a latitude, longitude options. Loading a large area of data from an online source may will result in longer load and redraw times.
With a slower internet connection, optionally choose to Restrict Source to Selected Bounds to just perform a one-time download of the relevant data.
3. Press the Connect button to download the data.
If the selected data is loading with labels that are too small to read, or an otherwise inaccurate zoom level for the map display, load the data again and modify the Detail Level requested using the slider.
Select Online Source to Download

Search Sources
Use the search bar at the top of the dialog to filter the list of available built in and custom sources based on a keyword or phrase.
All Sources Tab - This is the full list of all built-in and custom sources. Built-in sources are sorted by data type.
Popular Tab - This tab provides the same sources as the Popular section of the All Sources tab while providing a small preview of sample data.
Premium - These sources require accounts with the third-party vendors. These sources often provide higher-quality data. For more information about a source, right-click on a source and choose Display Source Web Page/ Terms of Service.
Favorites - To add a source to your Favorites tab, right-click on the source in another tab and choose Favorite Source.
For more information on a source, right click to Display Source Web Page/ Terms of Service.
File Menu options
Add New Source
Allows the user to add a custom data source. Instructions are found on the Adding Custom Online Sources page.
Add Sources From File...
Use the Add Sources From File button to add new WMS sources from an external text file. Web tile formats exported from Global Mapper will create a *.gm_source_def.xml file that can be added here to reload the exported tiles. This XML file is also created by right-clicking on an existing custom source and selecting Save Selected Source Definitions to XML file.
Load ECW from Web...
The Load ECW from Web button allows the user to open an ER Mapper Compressed Wavelet (ECW) image file directly from an Image Web Server URL using the ECWP protocol. While these files may be terabytes in actual size, only the portion needed for the current display window is downloaded, allowing for the browsing of extremely large data sets.
Selecting the Load ECW from Web displays the Load Image From Web dialog (pictured below). This dialog allows the user to either select a predefined web link for loading or to enter the URL of any available ECW file served by Image Web Server. To access a specific ECW image from the web, press the Add Link... button. This button causes the Add New Web Link dialog to be displayed.
-
The Group Name drop list allows the user to select which group, if any, to place the new link in. Any of the predefined groups can be selected, or a new group name can be entered. Leaving the group name blank will cause the new link to appear at the root level of the tree.
-
The Description field is where the name of the link is entered. This is what will be displayed for the link on the main dialog. Leaving this blank will cause the URL to be displayed instead.
-
The URL field is the most important piece of this dialog. This is where the address of the ECW file to load is specified. The URL should begin with the prefix ecwp:// with the remainder being a valid path to an ECW file served using ER Mapper's Image Web Server software.
Once entering the information about the new web link is completed, press the OK button to complete the entry and have it added to the web link tree in the Load Image From Web dialog.
Pressing the Edit Link... button allows the user to edit the currently selected web link. Note that the built-in web links cannot be edited.
Pressing the Delete Link... button will delete the currently selected web link or group from the web link tree.
An error message indicating that the settings have been updated to support the ECWP protocol whenever an attempt is made to load an ECW layer from the web indicates that it is necessary to download and install the latest ECW ActiveX plugin
Delete Cached Files...
Use the Delete Cached Files button to remove any locally cached files from any particular type of data sources. This is useful if the online data may have changed or if you have downloaded corrupt files somehow. See also Temporary Files folder in Advanced Configuration for location of cached files.
Save Selected Source Definition(s) to XML File...
this option will save the online source definitions for user defined online data services to an XML file. This option is not usable on built-in data sources.This provides an easy way to share your list of WMS sources with other users. Export a set of custom sources to XML or provide another user with the user_online_sources.xml file from the User Data and they can load that file with this button to add the custom sources to their source list.
Connect to Online Data Source Settings
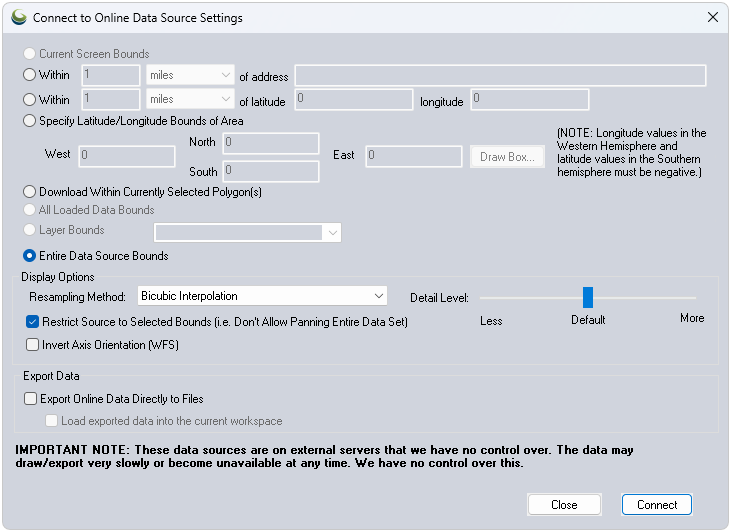
Select Area to Download
Specify the initial extent of the data to be downloaded. Choose from the following options:
Current Screen Bounds - This setting will download the data to cover the extent of the current screen bounds
Within distance of Address - This setting will use address geocoding to request and download data contained within the square extent of the distance radius. It will also place a label at the indicated address.
Within distance of Latitude, Longitude - This setting will download data contained within square the extent of the distance away from the specified Latitude, Longitude value.
Specify Latitude/Longitude Bounds of Area - This setting allows specifying a custom bounding box for downloading data. Use the Draw a Box button to dynamically draw an extent on the existing map.
Download within Currently Selected Polygon(s)- Downloads data contained within the bounds of the currently selected polygon, and clips the data to the polygon(s).
All Loaded Data Bounds - Downloads the entire bounds of the datasource.
Layer Bounds - Downloads data within the extent of the layer selected in the dropdown menu.
Display Options
Under Display Options, Resampling Method has a drop down menu that allows for the selection of a specific Resampling Method. This can add clarity to streaming data, depending on whether or not resampling is enabled. The default setting is bicubic.
The Detail Level will allow online layers to draw data at a lower resolution than the screen for faster display, allowing for control of online layers so that you can pull from lower or higher resolution layers, rather than the default screen resolution calculation.
Check the Restrict Source to Selected Bounds option to restrict the selected data source to availability within the user-specified bounds. It is then possible to pan around the entire data source, but the default view will be the bounds specified.
Check the Invert Axis Orientation (WFS) option to load data from a Web Feature Service (WFS) source with the axes swapped.
Data Resolution
Once the
data to download is defined, Global Mapper will automatically download
the most appropriate zoom level to display as the map is zoomed in and out.
An overview of the data will be visible when zoomed out, with more detail
becoming available when zoomed in. This allows directly loading the image
files from the cache in the temp folder as well as adding them to a map
catalog, allowing easy offline access to downloaded online tiles. (To
include World or PRJ files for the data in data downloads, go to the General Advanced section of the Configuration dialog
and under Miscellaneous Options, select Save World/PRJ
Files for Download Tiles. Once selected, world files will be automatically
generated for all tile images downloaded from an online source, in addition
to a default.prj file. Both the world and prj files are saved to the image
download folder.)
The data can be exported in full resolution to any of the supported raster
export formats, such as GeoTIFF, JPG, or ECW. The most appropriate detail
level for the export sample spacing will be used to obtain the source
data for the export.
Each data source load will then appear as a separate layer in the Control Center. Each entry can have its display options modified just like any other raster layer to drape it over elevation data, blend it with other layers, etc.
Export Online Data Directly to Files
The check box enables the direct export of the selected data to save it as a local file available for offline use. Additionally check the option Load exported data into the current workspace to have the file open in your workspace when the download completes. Many of the Online Data Sources need to be exported and imported back into the workspace before they are compatible with Global Mapper's analysis tools. This option saves a step in that process.
Data Source Context Menu
Right-click on a source to see the following options:
Favorite Source - add or remove the selected source from the Favorites tab.
Edit Source Name/Group - This option will allow you to edit the Source Name for the online data source, or the Group the source belongs to. This option is not usable on built-in data sources.
Display Source Webpage/ Terms of Service- Provides additional information and metadata from built in sources. The source information for built in sources can also be seen once a source is loading by opening the Metadata and viewing the Additional tab.
Remove Source - This option is only applicable for Custom Sources.
Select Online Source Preview - Import a JPG image, 200 x 200 pixels, with EXIF position information to use as the preview image.
Open Cache Folder in Explorer - navigates to the file window explorer that contains the stored information relevant to this datasource. This setting does not apply to datasources that redirect to a website.
If the source hasn’t been loaded into the Global Mapper workspace before, a cashe directory does not exist error message will appear.