Georeferencing a Vector File
This quick start guide will walk you through your first georeferencing project. Follow these steps to georeference an unreferenced vector file, for example an AutoCAD file that is not in any known geographic coordinate system.
Open the Georeferencer by selecting Tools>Georeferencer. The georeferencer will open as a separate window.
Open your unreferenced vector image by selecting File>Source Data>Open and browsing to the file that you want to georeference. The image will be displayed in the Source Data Viewer window. You will need to be able to identify several locations in the image. You can georeference the image either by entering coordinate information for recognizable locations in the image, or by comparing the source image to another image that includes reference information.
Georeference by Entering Coordinates
Use this method if you have coordinate information for known locations in the file.
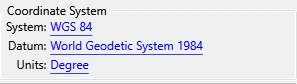
In the Reference Points List, click on the Coordinate System icon to select the coordinate system for your known points.
In the Source Data Viewer, use the ![]() zoom and
zoom and
![]() pan tools to locate your first known point. Select the
pan tools to locate your first known point. Select the ![]() pencil tool at
the far right of the toolbar to create a new reference point and click
on the known point. The pixel location of that point will appear in the
Source Coordinates area of the Reference Points List.
pencil tool at
the far right of the toolbar to create a new reference point and click
on the known point. The pixel location of that point will appear in the
Source Coordinates area of the Reference Points List.
In the Reference Coordinates area of the Reference Points List, enter the coordinate value for the first known point. Click the Add button to add this point to your list. It will automatically be named Point 1, and will appear in the Source Data Viewer window.
Change the Point Name to Point 2, and locate
your next known point. Use the ![]() pencil tool to select the point on the
image, enter the Reference Coordinates, and click the Add button. Repeat
the process for at least three known points. The errors of each point
will be shown in the Reference Point List.
pencil tool to select the point on the
image, enter the Reference Coordinates, and click the Add button. Repeat
the process for at least three known points. The errors of each point
will be shown in the Reference Point List.
Select Tools>Transform Source Data.
![]()
Double-click in the Input Coordinate Units box to select the units that are used in the source vector file. In the Output Data area, click the Browse button to select a file name and location. The output file must be saved as the same file type as the source file. The Reference Coordinate System will automatically be set to the system that you selected for your reference points.
Click the Transform button. A new, georeferenced vector file will be saved to your selected location.
Georeference by Comparing Images
Use this method if you have a second image file (either raster or vector) in the same geographic area, and the second file includes referencing information in a known coordinate system.
After you have loaded your source file and
it appears in the Source Data Viewer, load the reference file into the
Reference Viewer by selecting the ![]() Import Data into Current Map tool from
the toolbar in the Reference Viewer. This will allow you to view the two
images side by side.
Import Data into Current Map tool from
the toolbar in the Reference Viewer. This will allow you to view the two
images side by side.
Use the ![]() zoom and
zoom and ![]() pan tools in both viewers
to find the same point in both images. Select the
pan tools in both viewers
to find the same point in both images. Select the ![]() pencil tool in the Source
Data Viewer and click on the point. The pixel values will appear in the
Source Coordinates area of the Reference Point List.
pencil tool in the Source
Data Viewer and click on the point. The pixel values will appear in the
Source Coordinates area of the Reference Point List.
Select the ![]() pencil tool in the Reference Viewer
and click on the corresponding point in the reference file. The East and
North (or Latitude and Longitude) coordinates will appear in the Reference
Coordinates area of the Reference Point List.
pencil tool in the Reference Viewer
and click on the corresponding point in the reference file. The East and
North (or Latitude and Longitude) coordinates will appear in the Reference
Coordinates area of the Reference Point List.
Click the Add button to add this point to your list. It will automatically be named Point 1, and will appear in the both the Source Data Viewer window and the Reference Viewer window.
Change the Point Name to Point 2, and locate your next point. Use the pencil tool to select the point on the both the Source Image and the Reference Image, and click the Add button. Repeat the process for at least three points. More points will increase the accuracy of transformations. The errors of each point will be shown in the Reference Point List.
Select Tools>Transform Source Data. Double click in the Input Coordinate Units box to select the units that are used in the source vector file. In the Output Data area, click the Browse button to select a file name and location. The output file must be saved as the same file type as the source file. The Reference Coordinate System will automatically be set to the system that you selected for your reference points.
Click the Transform button. A new, georeferenced vector file will be saved to your selected location.