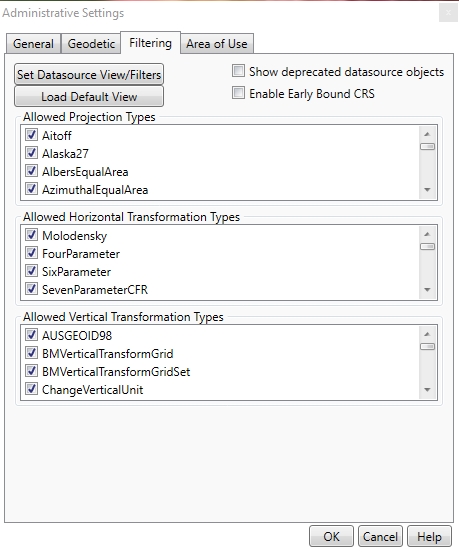
Datasource Filters
Filters can be applied to the geodetic data source to hide certain entries in the datasource from users. This feature can be used to provide a streamlined experience for users, or to keep users from choosing systems or transformations deemed inappropriate by an administrative user. The Administrative Settings Filtering options allow an administrative user to determine which Projections, Horizontal Transformations and Vertical Transformations are visible to users.
To place a filter on the view of the geodetic data source:
-
Go to Options>Administrative Settings and click onto the Filtering tab.
-
Click the Set Datasource View/Filters button:
-
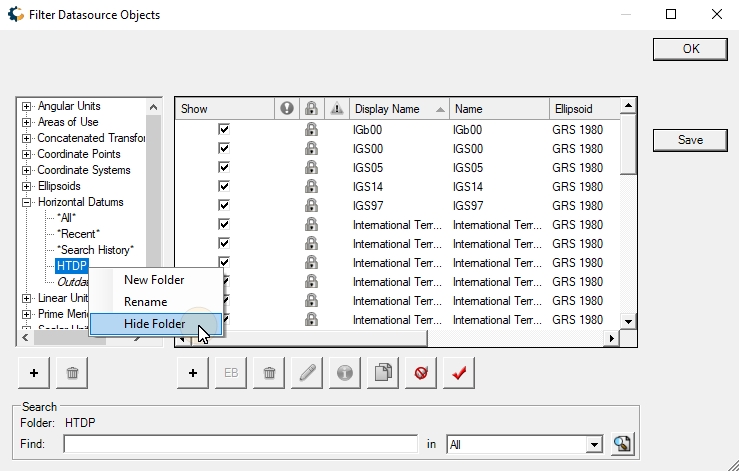
This will bring up the Filter Datasource Objects dialog:
Check or uncheck the Show box next to any object in the datasource to control whether or not it will be visible to users. You may click on the Show All and Hide All buttons: at the right of the button panel to hide or show all objects in the current folder at once.
-
You may also hide entire folders (along with all sub-folders) by right-clicking and selecting Hide Folder.
-
If a folder has been hidden, all immediate child objects will display as italicized. You may make it visible again by right-clicking and selecting Show Folder.

-
Once you have set all objects to be hidden or visible as desired, click Save. This will store your changes as part of the datasource view that is part of your current workspace.
-
From this point on, the filtered view will be available to users in this workspace, and those objects that have been hidden will not be available. To lock the Workspace to any of these restrictions, see Password Access.
More Information
When you make changes to the filters (as above) or add new custom objects, the view file is updated. Should you wish to revert to the default view, you may use the Load Default View button:
This will replace your custom view with a fresh copy of the default. This may be desirable if the default view has been significantly updated (for example, in Geographic Calculator 7.4 new HTDP folders were added to provide easy access to the HTDP datums and coordinate systems). A user with a custom view based on an older default view would not have those new HTDP folders. Note, however, that if you choose to load the default view, any custom folders or reorganization of objects will be lost, and any custom object will be placed in the top level folder for its type.
When loading the datasource, objects that are not contained in any of
the existing view folders will be added to the view at the top level of
the folder corresponding to their object type. This may happen during
an upgrade if new objects have been added to geodata.xml. If a new Projected
Coordinate System has been added to the geodata.xml but it is not in the
user's custom view, that new coordinate system will be added under the
"Projected Coordinate Systems" folder.
The location of the View file may be verified or changed in File Locations. Under the Datasource menu, the Merge Data Views option allows users to merge an updated viewfile (i.e. the geodata.xvw) with their own custom viewfile,
This way, any new systems that have been foldered will be placed in matching folders within the user’s View file, without losing any customizations from the previous View file.
Deprecated Objects
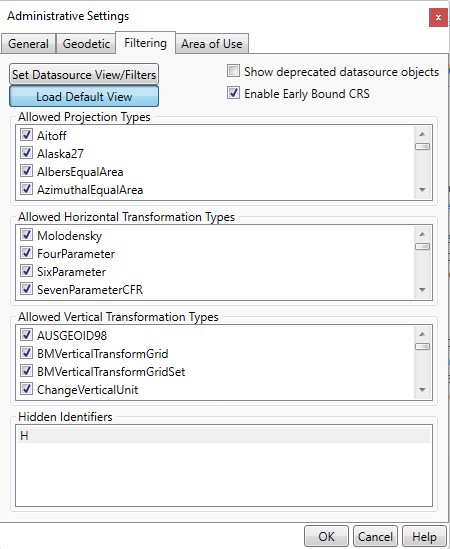
Deprecated objects are hidden by default. If you wish to view deprecated objects in the standard object editor and viewer dialogs, check the Show deprecated datasource objects checkbox.
Hidden Identifiers
Datasource objects with Identifier names matching items in this list will be hidden. Right click to Add or Remove Identifiers.